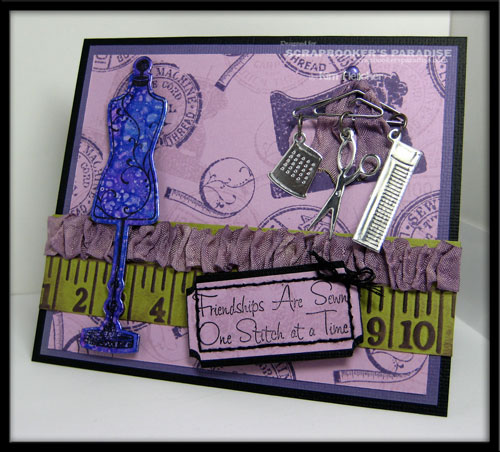
Tuesday, August 30, 2011

Faux Mosaics Card

Hi all, so it's time for another tutorial over on the Scrapbooker's Paradise Blog and I decided to do Faux Mosaic Tiles. So make sure that you check out my tutorial here. This is a really easy way to create a tiled look without using tiles!!! So here's how I used my piece from the tutorial................


Products Used:

Cardstock: White, Black, Pink, Basic Grey Out of Print 12"x12" Papers- Etchings and Headlines

So for this card I actually sprayed the tiles with the Perfect Pearls Mist- Perfect Pearl (of course this doesn't show up on the pic) and then added the seam binding ribbon and bow, which I coloured with the Tim Holtz Distress Stain- Spun Sugar. I stamped the saying with the Lipstick Pink and embossed it with the Black Soot EP. Then just did some, well a lot of layering with the Out of Print and cardstock. I also used the Cherish Punch on the pink cardstock and patterned paper and then layered them and of course it needed some bling! :-) That's pretty much it for this card...........I hope you check out my tutorial and enjoyed my card...........till next time....... 

Sunday, August 21, 2011

Vintage Bird Cage Card

Hi all.........We finally have gotten in the one La Blanche stamp that I have been wanting for a long time, so I decided that I would pair it up with the Prima Printery Collection of papers. I think that these papers are one of my absolute favourites, so vintage and yet you can do pretty much anything with them. So here's my card and feel free to leave comments :-), we all love comments!!!

Products Used
Inks: Ranger Archival Ink-Black, Tim Holtz Distress Ink-Fired Brick, Faded Jeans, Tumbled Glass, Frayed Burlap, Weathered Wood, Bundled Sage, Vintage Photo and Forest Moss

So here's how I made this......I used the Antique Linen Distress Stain on the cream cst and then I stamped the Bird Cage with the archival ink. I used the Cut N Dry Nibs and the Distress Inks to colour it in. Then I die cut the 3 butterflies from the Prima paper and layered them with the black cst cut from the scalloped circle die. I used the prima papers for layering and then I added the bling.Of course I just had to add the Rock Candy on all 3 circles and the Lovely word, then pop dotted them onto the card. Well that's all for this card......you really have to check out the Prima Printery Collection and the La Blanche stamps they are both so awesome!!! Till next time....................have a great week!!!


Don't forget that you will receive FREE shipping on orders over $50 placed before August 31st, 2011. 

Shipping order total calculated before GST. Offer valid only within the ten Canadian provinces. Orders destined for Labrador, Nunavut, Yukon, NWT, United States and abroad will be charged the actual shipping amount

Tuesday, August 16, 2011

Feature Product Post and a Giveaway!!!!

Hi all, well it's that time again for another Featured Product and this time it's..................Tim Holtz Tools!!! I chose to play with his Distress Tool and Sara decided to use his Craft Knife........and if you would like to win one of his tools............go to the bottom of my post for the deets.

Here's what I did.................

Products Used:

Cardstock:Coredinations Red and Green, White and Authentique Wonder 6x6 Paper Pad
Stamps: Unkown Vintage Christmas Stamp
Inks and Stains: Tim Holtz Distress Stains- Antique Linen and Fired Brick, Tim Holtz Distress Ink- Peeled Paint and Fired Brick

When I saw the new Authenitique Wonder line I just had to make a Christmas Card!!! I love the vintage look of this new line.......so here's how I made this. I used the distress tool on everything.......I covered the white cst with the antique linen distress stain and then stamped on it with the peeled paint ink, once it was dry then I applied the rock candy distress crackle paint. Then I used the antique linen stain again, this way it seeps into the cracks to give it that old vintage look. I used the 3 icons and the 1 notable from the Authentique Wonder collection and added some rock candy distress stickles to all of them. I coloured my seam binding with the fired brick stain, these are awesome for dyeing your ribbons!!! The rest is just layering, curling some of the corners and distressing.

So I hope you all enjoyed my Christmas Card in August :-)...............so now for the deets.....

First you should go and check out Sara's blog and see what she did with her Craft Knife!!!

Now how to win.......all you have to do is head back over to the Scrapbooker's Paradise Blog and leave a comment on the Feature Product Post. How easy is that!!! So until next time...................


Monday, August 8, 2011


Hi all....well it's time for another Showcase Monday on the Scrapbooker's Paradise Blog and this time we are doing Wonderful Whimsical Kids........so I decided to do a girl's birthday card and I wanted to do something kinda fun.......so here's my take on it.........

Here's the front of the card....................


and I actually even did the inside for this one.....................


Products Used:
Cardstock: Dark Purple, Light Purple and Kaiser Craft Magic Happens 6"x6" Paper Pad
Stamps: Flourishes- Kids at Play and Gina K Designs - Wishes and Dreams by Alicia K


So I picked up some of the new Fran-tage embossing powders from Stampendous and they are amazing......I have used quite a few of the colours now and you can get actually two different looks from them.....how you ask??? If you heat it from the top it gives you one look and if you heat it from the bottom it gives you another!!! You really have to try this stuff it's amazing!!! It actually tells you on the jar to heat it from the bottom and if it wasn't for one of our awesome customers....thanks Arlene!!!......I would never have known. Who reads instructions anyways.....lol.......it's just embossing powder!!! :)

When I found out we had to do a Kids Theme......I was seriously wondering what I was going to do.....then I remember that I had the Kaisercraft Magic Happens 6"x6" Paper Pad and it has such cute fairies and then I remembered I also had the Flourishes- Kids at Play stamp set, so I thought that this would be a good combination to make a great birthday card for a little girl!

So, here's how I made it.........I used my spellbinders dies to cut out 4 of the diecuts then I used my embossing folder on one of them and with my blending tool and the dusty concord ink I highlighted the raised image and around the outside. Then on the dark purple cst diecut I used the stamp with the versamark and then embossed it using my new shabby blue embossing powder, hey, did I mention that I love this stuff yet :)......then I thought that it just needed a little something, so I used my scor-tape and the mixed berries glitter around the die cuts..........and what little girl doesn't like glitter!!! Now I adhered my embossed image over the embossed diecut, Then I used the corner chompers on the patterned paper and all 4 corners of the card, then I added the ric rac and pop dotted the diecuts to the front of the card. I added a sentiment and little more glitter and of course some bling!!! The sentiments are from Gina K set.....I thought they matched perfectly with the card!!! Well that's pretty much it for this card..........I hope you all have a great week!!! Until next time............

Go and check out the embossing powder at Scrapbooker's Paradise Online Store you just never know what else you might find while you're there!!!

Wednesday, August 3, 2011

Sew Nifty Card

Hi all, so who's ready for another card??? We got the cutest stamp and die set in from My Favorite Things and I just fell in love with the little scissors!!! So I decided to use it for this post.....and I even used my favourite colour.........Purple!!! So onto today's post..........


Products Used:
Cardstock:Black, Dark Purple, Light Purple, Green and Ranger Metal Foil Sheets
Inks: Ranger Archival Ink Black, Black StazOn, Tim Holtz Distess Inks- Dusty Concord and Milled Lavendar, Tsukineko GlazOn and Ranger Alcohol Ink Nature Walk
Misc.: Tim Holtz Hangers, Cuttlebug Embossing Folder- Measure by Measure, Seam Binding, Black Floss, Needle, Tim Holtz Ruler and misc. brad


So first I stamped the dress form, then I cut the foil with the dies and then I applied the Glaz On, (this way when I apply the alcohol ink it won't react with the StazOn) now I applied the alcohol ink to the dress form. I just love these dies, they are just soo cute!!! For my tutorial on how to line up your dies and stamps click here. I stamped the lt. purple cst with the stamps and both distress inks. I embossed the green cst with the measuring tape folder and inked it with the dusty concord. I dyed the seam binding with the distress ink pads and crumpled it up, then I dried it with my heat tool and adhered it to the top above the embossing. I stamped the saying on the punched shape and sewed around it adding a tiny bow at the corner. I hung the 3 little die cuts from the hanger with jump rings and added a small piece of the dyed seam binding. Then I used a brad to attach it. Well that's pretty much it for this card..........so until next time......................Have a great week!!!

Sew head on over to the Scrapbooker's Paradise Store and check out the products............don't forget that there's .................Free Shipping on Canadian orders over $50.00!
Shipping Order total calculated before GST. Offer valid only within the ten Canadian provinces. Orders destined for Labrador, Nunavut, Yukon, NWT, United States and abroad will be charged the actual shipping amount