Showing posts with label My Favorite Things. Show all posts

Monday, October 24, 2011

It's a Spooky Halloween Card


Hi all, so it's another Showcase Monday........and I really wanted to play with my new Tim Holtz Seasonal Distress Inks......I just love these new colours that he has out, I really hope you all bought yours, since they are limited and will not be out again until next year!!! But as you know I pretty much love anything Tim Holtz, so I just couldn't resist picking up his new colours!!! ;) So since Halloween is in the fall.....I did a Halloween card.........so this is what I came up with..........


Products Used
Cardstock: Black and White
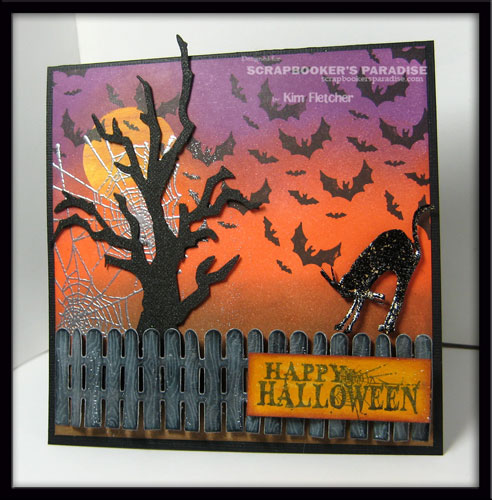
Ink: Tim Holtz Distress Inks- Fall Seasonal Set, Weathered Wood, Wild Honey and Black Soot, Versamark and Versafine -Black Onyx
Dies: My Favorite Things- Fence and Tim Holtz- Branch Tree
Embossing Powder: Tim Holtz Distress- Walnut Stain, Stampendous- Aged Black and Tsukineko- Silver

So here's how I made this card.....first I applied the Wild Honey Ink to the area that I wanted my moon, then I used my punch and some repositionable adhesive and covered it up, then I used my new fall Distress inks on the background with the blending tool. Then I removed my mask and stamped the bats. Then using my versamark, I stamped the cobwebs and embossed with the silver EP. I die cut the tree and used the Walnut Stain EP on it. I die cut the fence and used the Weathered Wood and Black Soot Ink on it, then I covered it with the Crackle Paint. I stamped and embossed the cat with the Aged Black EP and fussy cut it out. I stamped the saying and used the Wild Honey and the Seedless Preserves with the blending tool, then I covered this with the distress stickles. Now all that's left is to put it together!!! I hope you all enjoyed my Halloween card............so that's all for this time.............until next time........Have a great week!!!

Don't forget that the Scrapbooker's Paradise Online Store is offering free shipping for order's over $50 until October 31st, 2011 
Shipping order total calculated before GST. Offer valid only within the ten Canadian provinces. Orders destined for Labrador, Nunavut, Yukon, NWT, United States and abroad will be charged the actual shipping amount.

Wednesday, August 3, 2011

Sew Nifty Card

Hi all, so who's ready for another card??? We got the cutest stamp and die set in from My Favorite Things and I just fell in love with the little scissors!!! So I decided to use it for this post.....and I even used my favourite colour.........Purple!!! So onto today's post..........


Products Used:
Cardstock:Black, Dark Purple, Light Purple, Green and Ranger Metal Foil Sheets
Inks: Ranger Archival Ink Black, Black StazOn, Tim Holtz Distess Inks- Dusty Concord and Milled Lavendar, Tsukineko GlazOn and Ranger Alcohol Ink Nature Walk
Misc.: Tim Holtz Hangers, Cuttlebug Embossing Folder- Measure by Measure, Seam Binding, Black Floss, Needle, Tim Holtz Ruler and misc. brad


So first I stamped the dress form, then I cut the foil with the dies and then I applied the Glaz On, (this way when I apply the alcohol ink it won't react with the StazOn) now I applied the alcohol ink to the dress form. I just love these dies, they are just soo cute!!! For my tutorial on how to line up your dies and stamps click here. I stamped the lt. purple cst with the stamps and both distress inks. I embossed the green cst with the measuring tape folder and inked it with the dusty concord. I dyed the seam binding with the distress ink pads and crumpled it up, then I dried it with my heat tool and adhered it to the top above the embossing. I stamped the saying on the punched shape and sewed around it adding a tiny bow at the corner. I hung the 3 little die cuts from the hanger with jump rings and added a small piece of the dyed seam binding. Then I used a brad to attach it. Well that's pretty much it for this card..........so until next time......................Have a great week!!!

Sew head on over to the Scrapbooker's Paradise Store and check out the products............don't forget that there's .................Free Shipping on Canadian orders over $50.00!
Shipping Order total calculated before GST. Offer valid only within the ten Canadian provinces. Orders destined for Labrador, Nunavut, Yukon, NWT, United States and abroad will be charged the actual shipping amount

Tuesday, July 26, 2011

Hello Friend Pocket Gift Card

Hi all....well it's time for another tutorial on the Scrapbooker's Paradise Blog....so if you would like to know how to line up your stamps with your dies head on over there for my tutorial. Here's the card I made using My Favorite Things Die-namics- Pretty Pocket............

Products Used:
Cardstock:Black, White and Basic Grey Out of Print 6"x6" Paper Pad
Inks: Tim Holtz Distress Inks- Weathered Wood, Faded Jeans and Chipped Sapphire, Ranger Archival Black Ink

So I used the embossing folder on the patterned paper and adhered it to the front of the card. Then I cut out the pocket from the front of the card and used my ink blending tool with all 3 Distress Inks over the embossing. I used my scor-tape on 3 sides of the pocket I made in my tutorial and lined it up on the inside of the card so when it's closed you will see the pocket. I also stamped friend and hello on the tabs I die cut and then used my distress inks on them. These are placed one on the outside and one on the inside. Here's what the inside looks like:


You can use the pocket on the inside for a gift card. Then I made a rose from some of the patterned papers and the rose creations die and I also cut out some leaves. I used the glue gloss on the rose and the leaves, then I sprinkled some of the glitter on them. Then I adhered it to the front of the card. Here's a close-up of the rose, you can actually see the glitter :)..............


So that's it for how I made this card...............so until next time........................Have a great week!!!


Monday, January 31, 2011

Pearls & Gold Embossed Birthday Card

Hi all........boy time is sure going by fast.....I can't believe that it's the end of January already.....guess that means we are getting closer to the warm weather at least! Well I bought some of the new Hero Arts Stamps and the new My Favorite Things Die and Stamp set and I just had to play with them.....so here's what I came up with.........


Products Used:

Cardstock: White & Gold Metallic
Stamps: Hero Arts Cling Stamps- Classic Fabric Designs & Happy Definition, My Favorite Things Stamps & Die Set- Textile Rectangle

So, just a quick mini tutorial on how this was made.........I stamped the Happy Definition stamp with the rich cocoa and then stamped over this with the Versamark and the Classic Fabric Design stamp. Embossed with the gold EP. I did a second generation stamping with the Classic Fabric Design stamp and the rich cocoa ink, then stamped the MFT frame and sentiment with Versamark over that and embossed with the gold EP. Then I cut it out with the die. I embossed the white cardstock with the houndstooth folder. Then I decided to add a flower, so I made one of the ribbon flowers and added some leaves. If you want to know how to make these flowers, Hannah did a awesome video tutorial here. Then all that is left is to put it together and add the pearls. I hope you all have a great week!!! So, until next time...........

Sunday, January 16, 2011

Time for Our Feature Product Post and Who Would like to Win Some Blog Candy?????

Hi all, well it's time for another Feature Product Post and this time it's the Stampendous Embossing Powder Kits!!! Love them, they give you a great way to try a bunch of colours and a little goes along way!!! So who's up for winning some awesome powders..........see the deets at the end of my post!!! So onto today's post, this time I decided to make 2 cards and I hope you like them.......l know I enjoyed playing with these powders!!! So here's the first card............


Products Used:
Cardstock: Black, Core'dinations All in the Family- Violets
Ink:Versamark & Ranger Archival Black Ink

So a little bit of how I put it all together.....I die cut the card and the sticky backed canvas with the spellbinders dies, then I peeled the backing off of the canvas and used the sticky back to apply the EP's, one at a time heating them as I did each colour. I really love the effect of this, it looks awesome!!! Then I stamped it with the Music Background.  Now I die cut the black cardstock for the flourishes and used the Versamark ink on them and then the EP's. Then I stamped the sentiment, embossed it and punched it out using the Photo Labels punch. Then I just added some of the rhinestones to the flourishes, you know  I love my bling!!!!

Now, onto the second card............I really wasn't too sure about this card, but I figured I would share it anyways.........so here it is.......let me know what you think........


Products Used:
Cardstock: White, Core'dinations all in the Family- Violets & Pretty in Pink

Well, are you still with me???.........lol....so the info on how I did this card.

First, I die cut the flowers then I used my Stamp-a-ma-jig to line up the stamping. I love the MFT dies and stamps, they're awesome!!! If you're not sure on how to use a Stamp-a-ma-jig see this post.....it definitely comes in handy and is so quick and easy to use!!! Then I coloured in the flowers with my versamark marker and embossed, doing only one colour at a time, that way they don't mix together. Once the flowers were done, I added the flower soft to the center. Then, I used my embossing folder and I sanded the cardstock. Die cut the lacy circle twice and cut them in half. On the bottom one, I used the EP 3x and then stamped into it with my sentiment, while it was still hot..........it showed up really well in person, but not so much for the camera........lol....so I used my Stamp-a-ma-jig again and used the Staz On white, now it shows up better for the camera, and I actually like how it looks. Did a little bit of sanding on them added my ribbon and tied a bow.  

That's pretty much it for this card..........okay now on to the good stuff..........would you like to WIN one of the Stampendous EP Kits???? All you have to do is head back to the Scrapbooker's Paradise Blog and leave a comment on the Stampendous EP featured product post.........how easy is that!!!

Now, check Sara's post to see what she's done with her Embossing Powders!!!

Don't forget to check out Scrapbooker's Paradise Online Store, and receive FREE SHIPPING on all orders over $50 this has been extended until January 31st, 2011

**The shipping charge in cart will be removed when the order is processed. Order total calculated before GST. Offer valid only within the ten Canadian provinces. Orders destined for Labrador, Nunavut, Yukon, NWT, United States and abroad will be charged the actual shipping amount.


Also, Stampendous Embossing Powder Kits are only $10.75 between January 16th - 31st, 2011 use Code:FIEK in the comments section!!!
 
Till next time....................