Showing posts with label Hero Arts. Show all posts

Sunday, September 25, 2011

Birthday Flourishes

Hi all.....well it's time for another post and I used some of my favourite Distress Inks and it's in my favourite colour....Purple!!!


Products Used

Cardstock: Black, White and Ranger White Glossy Cardstock
Misc.: Maya Road Chipboard- Mini Scrolls and Mini Antique Keys, Tim Holtz Distress Embossing Powder- Dusty Concord, Tsukineko Clear Embossing Powder, Misc. Black Sparkle Embossing Powder, Ranger Perfect Pearls- Jewels, Basic Grey Basics Paper Ribbon Dollies, Ranger Ink Blending Tool and Misc. Rhinestone


So, I stamped the Flourish with Dusty Concord and then I stamped it again with Versamark and embossed with the clear EP. I used my distress inks and the blending tool for the background. I added the paper ribbon, which I used the Perfect Pearls on. Inked the mini scrolls with Versamark and used the Black Sparkle EP on them and then I did the key with the Black Soot and the Dusty Concord EP and adhered them all to the front. I cut the banner from the Glossy White CST, leaving the CST in the die, then I used the Blending Tool with the Milled Lavender. Stamped my sentiment with the StazOn and pop dotted it on my card. Added the rhinestone to the key and that's it for this card, so...........until next time!!! Have a great week!!!

Sunday, May 15, 2011

Featured Product Post Starring........Cupcakes Galore!!! and a Chance to Win the Featured Product!!!

Hi all.............well it's that time again for the Featured Product Post....and a chance to win a set of clear Inkadinkado stamps, scroll down to the bottom of my post for all the deets..........So, I did something totally different for me and I didn't use any Tim Holtz products...........are you surprised??? Well, I hope you all enjoy my card and don't forget that Sara is also doing her post on the Featured Product as well.........this should be interesting, since we both picked the same stamp set :)........so here's the set...............


and here's what I came up with.........................

Products Used
Cardstock: Pink, Green, X-Press It Blending Cardstock & Jillibean Soup 6"x6" Pad- Blossom Soup
Inks: Momento- Tuxedo Black, Bamboo Leaves, Angel Pink & New Sprout

So a little bit on how I made this card, I stamped all the cupcakes from the Inkadinkado Birthday Cupcake set with my Tuxedo Black and coloured them in with my copics, then I fussy cut them out. I also hand drew 3 cherries with my black multiliner and then coloured them in with my copics and fussy cut them out and added them to the 3 large cupcakes. I stamped the Life of the Party stamp in Momento Bamboo Leaves ink and adhered it to the top of the green cst and the blossom soup patterned paper to the bottom. Then I added the ribbbon and a bow.

For the cupcakes.....2 of the larger ones I used the Tattered Angels Glam and for the other one I used the stickles. Then for the 3 smaller ones I used my Stardust pen, I added the Glossy Accents to all of the cherries. For the sentiment I used Momento Tuxedo Black. The Momento Angel Pink and New Sprout I used with one of little stamps from the Inkadinkado Birthday Cupcakes set to create a subtle background for the sentiment. That's pretty much it, other than putting it together.

Well, I bet you are all wondering how do I win the Featured Product........so all you have to do is head on over to the Scrapbooker's Paradise Blog and leave a comment on the Featured Product Post and some lucky person will win a set from Inkadinkado.

You really have to go and check out Sara's Blog and see what she did with this set!!!!

If you'd like to do some shopping at the Scrapbooker's Paradise Online Store and pick up some of the Inkadinkado clear sets, Regularly $10.99 they are on for $9.25, just quote  FICLRINKA in the comments section of your order.

Well that's it for this time..........until next time..............have a great weekend!!!!

Tuesday, March 8, 2011

Double Embossing Resist Tutorial


Hi all, well I was playing around and with some of my stamps etc. and came up with this technique.......I'm not sure if anyone else has tried it or even if they have a tutorial out there somewhere, but I thought it would be great to show you all!!! My card will be shown at the end, along with all the products I used for it. I hope you all enjoy it..........so, onto the tutorial.

Supplies needed for theTutorial:
Smooth White Cardstock, I used the X-press It Blending Cardstock
Hero Arts Clings- Happy Definition & Classic Fabric Design
Versamark Ink
Ranger Ink Blending Tool with Foam
Tim Holtz Distress Ink- Tumbled Glass, Worn Lipstick, Crushed Olive & Walnut Stain
Tsukineko Clear Embossing Powder
Ranger Heat It Tool or other heat tool

Step 1: Ink up Happy Definition with the Versamak ink, stamp it on the white cardstock. Use the clear EP (Embossing Powder) and emboss with your heat tool.


Step 2: Use your blending tool with the foam and blend in the Tumbled Glass, Worn Lipstick and Crushed Olive, making sure to overlap your colours. You can wipe it with a baby wipe or a piece of paper towel to remove the excess ink from the embossing. Trim down to the size of the stamp. 


Step 3: Now before we do the next part make sure that the distress inks are completely dry, otherwise you will have the EP stick to the distress ink. (and yes, I learned the hard way....lol...) Ink up the Fabric Design stamp with the Versamark ink and stamp it over the Happy Definition embossed stamping, apply the clear EP and heat emboss this. I hope you can see how it looks in the photo.


Step 4: Now the magic happens......using your blending tool and the Walnut Stain Distress Ink, blend the ink and watch as a new design appears over top of the other one. You can wipe it again, with a baby wipe or a piece of paper towel to remove the excess ink from the embossing.


Here's a close up of it.....................


So that's it.....I really love this technique, I hope you have fun playing!!! Also, you can experiment with various stamps and colours, just remember that you want to use the darkest ink colour last, as it should be dark enough to cover all the other colours you have used. There's so much you can do with this technique, you could use just blues or purples etc., or try it with 2 different colours of EP.

Well I hope you enjoyed my tutorial, if you have any questions please feel free to leave them in the comments section and I will do my best to answer you ASAP.

Now onto how the card looks............


Products Used:
Cardstock: X-press It Blending Cardstock, Brown Cardstock

So all I did to finish the card was use the punch down the side, stamped and cut out the sentiment and tag, then added some bling and the ribbon and bow.

I did do another card with the same technique, but I used the new Heartfelt Creations stamps, Daisy Patch Background & Stained Glass Background instead, here's how it turned out..............

So that's it for this post..........I'm still waiting for the warm weather to come..........lol........it doesn't look like I'm going to get my wish anytime soon!!! :)  So until next time.......................

Don't forget........There's FREE SHIPPING on all online orders over $50 shipped before March 31st, 2011
Order total calculate before GST. Offer valid only within the ten Canadian provinces. Orders destined for Labrador, Nunavut, Yukon, NWT, United States and abroad will be charged the actual shipping amount

So head on over to the Scrapbooker's Paradise Online Store and do some shopping!!!

Sunday, February 13, 2011

Just a Note Card

Hi all.......it's time for another blog post!!! I bought this stamp awhile ago and actually did the card up, but I ended up getting sidetracked with some of the new products we got in.......lol........so anyways, here is the card I made...........


I love this stamp.......there's soo much you can do with it!!! It comes with 3 sayings, but you can put anything on the typewriter paper. So onto the product list and a little info on how I put this together.......

Products Used
Cardstock: White, Metallic Bronze & 7 Gypsies 8"x8" Paper Pad-Lilie
Inks: Momento Tuxedo Black Ink, Tim Holtz Distress Inks: Fired Brick & Brushed Corduroy

I really love the Hero Arts stamps, they have so many awesome stamps to choose from and these two are no exception......the dictionary sayings are great to add to the background of your card or layout. Well enough rambling onto how I put this together........

I use the Lillie paper on the front of the card and I inked and distressed the edges. Then I stamped it with the friend dictionary saying twice and tore a couple of strips, inked them and added them to the front. I stamped the typewriter onto the white cst and cut it out using the Labels 17 die and inked around it with both distress inks. I cut out the metallic cst with the Labels 17 die and adhered them together. Now, I stamped just the paper part again and cut it out, stamped the saying and used the brushed corduroy around the edges and pop dotted it over the paper, so it looks like it's coming out of the typewriter. It's really hard to see in the photo, but it really does look like it's coming out of the typewriter :) Then I added the ribbon and bow.......voila all finished!!! so that's it for this time..........I hope you enjoyed my post............see you again soon!!!

Head on over to Scrapbooker's Paradise and do some shopping, while your there check out all the new products that have come in and there's many more coming in!!!

Don't forget you will receive FREE SHIPPING on all online orders over $50 shipped before Feb. 28th, 2011
Order total calculate before GST. Offer valid only within the ten Canadian provinces. Orders destined for Labrador, Nunavut, Yukon, NWT, United States and abroad will be charged the actual shipping amount

Monday, January 31, 2011

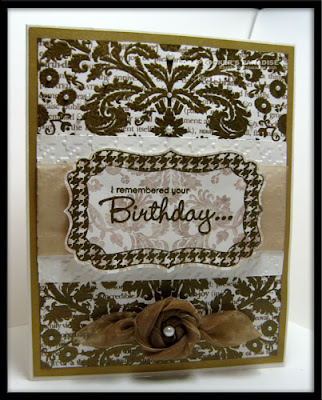
Pearls & Gold Embossed Birthday Card

Hi all........boy time is sure going by fast.....I can't believe that it's the end of January already.....guess that means we are getting closer to the warm weather at least! Well I bought some of the new Hero Arts Stamps and the new My Favorite Things Die and Stamp set and I just had to play with them.....so here's what I came up with.........


Products Used:

Cardstock: White & Gold Metallic
Stamps: Hero Arts Cling Stamps- Classic Fabric Designs & Happy Definition, My Favorite Things Stamps & Die Set- Textile Rectangle

So, just a quick mini tutorial on how this was made.........I stamped the Happy Definition stamp with the rich cocoa and then stamped over this with the Versamark and the Classic Fabric Design stamp. Embossed with the gold EP. I did a second generation stamping with the Classic Fabric Design stamp and the rich cocoa ink, then stamped the MFT frame and sentiment with Versamark over that and embossed with the gold EP. Then I cut it out with the die. I embossed the white cardstock with the houndstooth folder. Then I decided to add a flower, so I made one of the ribbon flowers and added some leaves. If you want to know how to make these flowers, Hannah did a awesome video tutorial here. Then all that is left is to put it together and add the pearls. I hope you all have a great week!!! So, until next time...........

Saturday, January 15, 2011

Toonie Thursday January 13th At Scrapbooker's Paradise Red Deer

Just a quick post.........I actually forgot to post this earlier....so I thought I would share it now......here's what we did for the Toonie Thursday at the Red Deer Store on Thursday!!!! I think I'm addicted to the sticky backed canvas, it's just so much fun to work with and there's so much you can do with it!!!! Okay......enough talking, onto the card I did............


So the flourish is from Hero Arts and is stamped onto the canvas with Versamark ink and then embossed with clear EP, then I sprayed it with some Tattered Angels glimmer mists, English Ivy and Sugar Plum Fairy. I was amazed that the EP didn't melt into the canvas, but it created this amazing look.......the card itself was cut out using the Spellbinders Grand Scalloped Squares, I added a little bit of ribbon then a sentiment from C.C. Designs-Sassy Sentiments Set..........gotta love those sentiments!!! Well that's it for this time.............till next time, have a great weekend!!!

Thursday, December 16, 2010

Scrapbooker's Paradise Feature Product Post and A Surprise????

Hi all.......well guess what, it's time for another feature product post! Don't forget to scroll down for the surprise..........and the feature product is...........Colorbox Cat's Eye Queue's, so I decided to make, as you probably have already guessed...........a card.......lol.....or should I say 2 cards........


The only difference between the two cards is that on the first one I decided to cut out the holly berries..........

Products Used

Cardstock: Linen, Green & Red
Strathmore Watercolor Paper
Colorbox Cat's Eye Queues- Beach Towels & Pool Party
Sakura Koi Waterbrush #2 Small & #6 Medium
Creative Imaginations Radiant Rain Shimmering Mist- Egyptian Gold

So all I did was stamp with Red Devil and Golf Course from the Cat's Eye Queue's on the cardstock with the holly stamps from Stampendous, then sprayed it with the Shimmering mist. I stamped the Holly Berry stamp with the gold on watercolour paper and embossed with gold embossing powder. Now the fun part.....I coloured the holly in with the Cat's Eye Queue's and the waterbrushes, I love this technique it's soo much fun to do and a easy way to add some colour to your stamped images!!! If you haven't tried it, you should give it a try!!!

Well that's it for these cards......bet you thought I forgot about the surprise.........lol..........

BLOG CANDY!!!! BLOG CANDY!!!! BLOG CANDY!!!! DID I SAY BLOG CANDY!!!

well if you would like to win our featured product head over to the Scrapbooker's Paradise Blog and leave a comment on the post for the Feature Product.......a winner will be randomly chosen on Monday Dec, 20th!!!

Now head on over to see Sara's Blog to see what she's done with the feature product!!!

So while you're shopping at Scrapbooker's Paradise........pick up our Featured Product the Colorbox QUEUE they are on sale for $9.50 (Reg $11.99) from Dec 16th-31st. Just use this code:FIQUE in the comments section!!!

Thursday, October 14, 2010

Toonie Thursday Oct 7th at Scrapbooker's Paradise

Well I had hoped to have this posted prior to Toonie Thursday.....but it just didn't happen..........but I thought that I would post it, just so you can see what you all missed.......lol

I did a Christmas Glitter Card.........

I used Hero Arts Happy Holiday Trees Stamp Set and Glitter Rittz Warm Highlights for this card. Sorry everyone but the Glitter Ritz is only available in Scrapbooker's Paradise Stores.......but you could substitute any transparent micro fine glitter in it's place.

So here's a short tutorial on how I did the glitter:

First stamp your image onto cardstock of your choice, then over your image apply Sookwang/Score Tape, making sure you remove the brown paper backing and do not touch the tape as it will leave fingerprints. Then cut out using a Die of your choice, you will be able to see your image if you removed the brown backing. Then carefully without touching the adhesive, remove the top liner of the tape, it says Sookwang.

Now the fun part.....apply the micro fine transparent glitter all over the adhesive/image and rub/burnish it with your fingers. Tap off the excess and you have a glitterd image. The more you rub the glitter with your fingers the shinier it becomes, due to the oils in your fingers. Well that's it........pretty simple.........now you can create awesome glittered cards!!!