Monday, December 19, 2011

My Top 5 Stocking Stuffers

HI all......well it's almost Christmas....it's sure coming up fast this year.....only 6 days left!!! Are you all done your shopping??? I'm still not finished, not sure where the time goes.....but I guess I had better finish up my shopping soon!!! Are you still looking to buy some stocking stuffers? Well, here's my top 5 stocking stuffers.......................and my project at the end!!!


Pick #1  Distress Inks, You can never have too many of these......I use them all the time.....

Pick #2  Distress Stains............great for covering your background or stamping with!!!


Pick #3: Perfect Pearls.............Awesome to use with your stamps and for painting!!!


Pick #4: Distressing Tool............what would I do without my distressing tool???


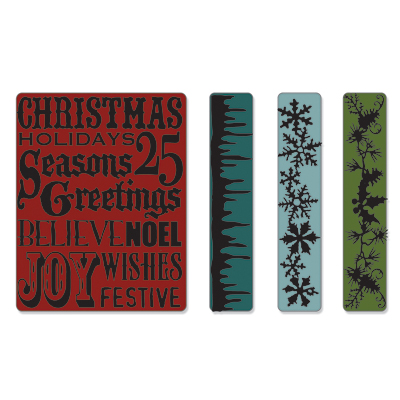
Pick #4: and last but not least.......Embossing Folders!!!
So here's my Project using my top 5 picks.....................


Products Used
Cardstock: White, Red and Green
Inks: Ranger Perfect Medium Black, Versamarker

First I used the Aged Mahogany stain on the white cst and then went over it with my Aged Mahogany Distress Ink. Then I stamped it with the black perfect medium and used my metallic perfect pearls on it and embossed it with the matching embossing folder, then I cut it just under the Season's Greetings. I embossed the red cst with the folder and adhered the other one over the top portion. I cut the holly leaves, the branch and the berries out with my die. I used the walnut stain stain on the branches and the rock candy paint on the holly leaves. I also used my versamarker on the leaves and berries, then I used the metallic perfect pearls on both of them. Using my blending tool, I used the gathered twigs distress ink on the leaves and twigs and then I added the bling. All that's left is to distress the edges of the card with my distress tool. Well that's it for this card..................Hope you all have a great week...........and A VERY MERRY CHRISTMAS!!!.............until next time.......................


Friday, December 16, 2011

Another Featured Product Post and A Giveaway!!!

Hi all.........so here we are again.....another featured product and this time it's........are you ready?????.................the New Graphic 45 Inks!!! These inks match the Graphic 45 line of paper, so it takes the guess work out of which ink matches! So, all the deets on how to win one of these inkpads will be at the end of my post.....so onto today's post.............


So if you haven't already, you really need to check out what Selena has done with these inks, you can go to her blog here. I'm sure you will love it!!!


So here's what I came up with............................


Products Used

Cardstock: Ranger #8 Manila Tag, Cream, Grapic 45 Christmas Emporium 12'x12' paper- Believe and Special Delivery
Misc.: Tsukineko Clear Embossing Powder, Perfect Pearls Mists- Biscotti and Turquoise, Distress Crackle Paint Rock Candy, Distress Stickles- Rock Candy and Aged Mahogany, Ranger Blending Tool, Canvas Corp Mini White Bags, Tim Holtz Distress Tool, Tim Holtz Christmas Muse Tokens and Seam Binding

So pretty much everything is distressed and inked with the Graphic 45 ink. I did the background of the tag with the versamark and clear EP, then used my Graphic 45 inks and the blending tool and sprayed it with the Biscotti. I did the mini bag with the Dark Cashmere ink and stamped it with the jet black, then sprayed it with the Turquoise......I love these mini bags they are just so darn cute!!! They will also fit a Gift Card in them too!!! I made my own banner inked and distressed it. I cut out the holly leaves and added some Rock Candy distress stickles.  I also added the Rock Candy Crackle paint to the stamp from the Graphic 45 paper. All the seam binding is also dyed with the Graphic 45 inks and then I used the Aged Mahogany Sticles to make the berries.The rest is pretty easy you just have to put it all together now. So I hope you enjoyed my tag............and now who would like to win one of these inks!!!!

So head back over to the Scrapbooker's Paradise Blog and leave a comment on the Featured Product Post for the Graphic 45 Inks..........you could be the lucky winner of an ink pad!! Don't forget to check out Selina's Blog too!!!

If you can't wait and are doing some shopping at the Scrapbooker's Paradise Online Store......you can get these inks on sale for $5.50 (Reg. $6.99) just quote FIGI in the comments section of your order and don't forget they are only on sale from December 16th-31st, 2011!!!

Tuesday, December 13, 2011

My Version of Tim Holtz's Day 5 Tag

Hi all.....so I have been having fun creating some of Tim Holtz's 12 Tags of Christmas and today this is my version of his Day 5 Tag.....I did change a couple of things.....but I just love the technique on this tag...........so here's my tag.............


Products Used
Cardstock: White, Clear Transparency and Tim Holtz Grungepaper
Dies: Tim Holtz Tag and Bookplates, Tim Holtz Regal Crest

So I did the same technique that Tim did for the background, which you can check out on Tim's Blog. I did add 3 layers of the leaves instead of two and I added more pearls......you can never have to many pearls :) I did change the ribbon and instead of using the paint, I used one of the stains instead. I love this tag it's simple but so pretty. I hope you enjoyed my version of his day 5 Tag and don't forget that all our stores are doing the 12 Tags of Christmas as well which you can check out here. So that's all for this time...........until next time.......Have a great week!!!

Sunday, December 4, 2011

My Version of Tim Holtz's Day 3 Tag

Hi all!!! So whose been following Tim Holtz's 12 Tags of Christmas??? I'm sure you all know that I wouldn't miss them, so of course I have been following his tags :)......so since he's doing his tags, I thought that I would do one of my own.....it's not exactly the same as his, but his Day 3 tag inspired this one!!!
Also, did you know that all of our 4 stores are doing their own version of the 12 Tags of Christmas??? Just click on the coloured links to check them out!!! Well onto today's post..............


Products Used
Inks and Stains: Perfect Medium Black, Tim Holtz Distress Stains- Pine Needles, Fired Brick and Picket Fence
Misc.: Perfect Pearls Jewels Set, Perfect Pearls Metallic Set, Perfect Pearls Mist Heirloom Gold,  American Crafts Black Tulle, Tim Holtz Sanding Block, Maya Road Cream Ruffled Ribbon, Misc. Red and Green Bling

I dabbed the picket fence stain all over the black tag, then I stamped with the black perfect medium and coloured in the words with the perfect pearls. I used the embossing folder and made sure I lined up the stamped image with the words on the folder and then embossed. I love that he has the matching folder to go with his stamps!!! Then I sprayed it with the heirloom gold mist. I coloured the ruffled ribbon with the pine needles and fired brick distress stains and adhered them to the bottom of the tag. I added the strip of green bling to the top of the ribbon. Die cut the holly leaves, sanded them and then added the red bling. So I hope you all enjoyed my version of Tim's day 3 tag..........so until next time....................Have a great week!!!

Sunday, November 27, 2011

Noel with a Little Bling & Glitter

Hi all, I hope everyone is enjoying this warm weather we've been having here.......I would love it if it would stay this way for the whole winter :)

So onto today's post.....I thought I would try the new Want 2 Scrap Nestabling and the Nestaboards, the awesome thing with these is they match your spellbinders dies, so the possibilities are endless. Also, I actually didn't use any stamps to make this card, so I hope you all enjoy what I did with them!!!


Products Used
Cardstock: Red, Green and Graphic 45 Christmas Emporium 12x12- Tis the Season

So, I cut my card with the grand labels die, I love how you can make shaped cards with the grand dies, just gives you so many possibilities and I think out of all the label dies this is one of my favorites!!! I also cut all my layers with the die. I adhered the Graphic 45 paper to the nestaboard and edged it with the new Tim Holtz Festive Berries Ink. I added the scor-tape to my red cst and then cut the Noel out, then I applied the glitter. I used the Glue Gloss on the edge of the card and applied glitter. The rest is just putting it together........well I hope you all have a great week!!!.......until next time...... 

Monday, November 21, 2011

Dylan's Snowflake Christmas Stocking


Hi all, well it's that time again.......it's another showcase Monday and I have something I made that would make a great gift!!! Love the new Canvas Corp products.....so many great products to use for making those handmade Christmas Gifts!!!! So onto todays post.....................


Products Used


This was sooo much fun to make.....I used the Gesso on the whole stocking, then I stamped the snowflakes with the rock candy and sprinkled on the glitter. Dried it and used the stencil at the top and sprayed it with the denim colorwash. Stamped the snowflakes with versamark and used the white embossing powder on them. Used the espresso colorwash on the ribbon and the alphas, then I used the heirloom gold spray on the alphas to give them some shimmer. Then I added the pearls........it's too bad the shimmer and the glitter doesn't show up well in the pic.......but it does sparkle!!! Well, that's it for this time........until next time....I hope you all have a great week!!!

Wednesday, November 16, 2011

Featured Product and Another Giveaway!!!

Hi all......well it's that time again for another featured product and this time it's........


the 3L EZ Runner Duo and Mixed Pack from Nov 16th-30th Reg $12.50 On special for $10.50 just quote FIDP in the comments section of your order when you are ordering from the Scrapbooker's Paradise Online Store
 

So go and check out what Sara did with her adhesive, I love her scrapbook page!!!

Don't forget to scroll down to see how you can win a package of this awesome adhesive!!! 

So here's what I did with my adhesive and a few other supplies :) .......................


Products Used
Cardstock:Green, Brown and Cream
Stamps: Bo Bunny Father Christmas Clear Stamps
Inks:Tim Holtz Distress Inks- Aged Mahogany and Forest Moss, Ranger Black Archival Ink

So here's how I made these cards......for the Pyramids all you do is follow the directions that come with them. The package makes 4 cards and you have a couple of small tags as well. The 3D part doesn't stand out as much in the pic, but in person you can really see the difference!!! Then I inked up the cream cst for both of the cards with my distress inks and my blending tool. For the tag one I stamped it with the Father Christmas stamp set and my black archival ink, then I sprayed both of them with the Perfect Pearls Mist, they are really shimmery in person, but of course it doesn't show up well in the pic :)....then using my adhesive I mounted them onto the cardstock. That's pretty much it for these cards.......really simple to make and the 3D effect is awesome!!!
 
 So you really need to go and check out what Sara did with the adhesive, and don't forget to leave a comment on the featured product post on the Scrapbooker's Paradise Blog to win a package of adhesive!!!!

So that's all for this time....................until next time, have a great week!!!

Sunday, November 6, 2011

Simple Poinsettia Christmas Card

Hi all, I just can't believe we have snow here already :( it's just too soon for the white stuff!!! Oh well, I guess I just have to get used to it.....but I'm hoping for a mild winter!!! Anyways, I did a Christmas card for you today.....and I actually tried to keep it simple this time! So here's what I did................


Products Used:
Cardstock: White and Burgundy
Stamps: Penny Black- Ponsettia Script Background, Tim Holtz- Retro Holiday
Inks: Versamark, Tim Holtz Distress Stains- Aged Mahogany, Walnut Stain, Forest Moss and Antique Linen

So here's how I made this card, I used the Antique Linen on the white cst then I applied the Aged Mahogany and Walnut Stain to my stamp and stamped. I love how we can stamp with the Distress Stains....if you haven't tried it yet, you really should!!! Then I sprayed the Perfect Pearls Mist over top to give it some shimmer. Now I stamped the sentiment with Versamark and embossed it with the Gold EP. Then I outlined the Merry Christmas with my black pen, it really makes it stand out! Then I added my ribbon and the Ponsettia. For the Poinsettia, I used the stains on them to change there colour, then I dried them with my heat tool. That's it for this card.....I hope you enjoyed my Simple Card :)........hope you all have a great week!!!

Sunday, October 30, 2011

Poinsettia with a Shimmer

Hi all, wow this month sure has gone fast.......it's almost November and soon it will be Christmas!!! So is anyone actually ready for Christmas? I know I'm no where near ready!!! When you think about it, there's really not much time left, I guess I had better get busy and start doing some of the Christmas gifts that I want to make!!! ....So while I am on the subject of Christmas......I thought I would make a Poinsettia card, this is from the new Penny Black stamps that we got in! 


Products Used
Cardstock: Burgundy, White and Gold Shimmer
Ink: Versamark
Misc.: Cuttlebug Embossing Folder-Holly Stripes, Tsukineko-Gold Embossing Powder, Copic Marker- R89, Distress Stickles-Aged Mahogany and misc. pearl flourish

So I stamped the poinsettia 3 times with Versamark and then embossed with the gold EP and fussy cut it so that I was able to layer the 3 sizes of petals and then coloured them all in with my Copic marker, then added the distressed stickles to the petals. Pop dotted the Poinsettia over the 3 panels that I embossed with my folder and cut. Stamped and embossed the sentiment and added some pearl flourishes that I coloured with my Copic Marker. So that's it for this card...........the poinsettia and the gold shimmer paper look so much better in person!!! Well I hope you all have a great week and a Happy Halloween!!! Until next time...................... 


Monday, October 24, 2011

It's a Spooky Halloween Card


Hi all, so it's another Showcase Monday........and I really wanted to play with my new Tim Holtz Seasonal Distress Inks......I just love these new colours that he has out, I really hope you all bought yours, since they are limited and will not be out again until next year!!! But as you know I pretty much love anything Tim Holtz, so I just couldn't resist picking up his new colours!!! ;) So since Halloween is in the fall.....I did a Halloween card.........so this is what I came up with..........


Products Used
Cardstock: Black and White
Ink: Tim Holtz Distress Inks- Fall Seasonal Set, Weathered Wood, Wild Honey and Black Soot, Versamark and Versafine -Black Onyx
Dies: My Favorite Things- Fence and Tim Holtz- Branch Tree
Embossing Powder: Tim Holtz Distress- Walnut Stain, Stampendous- Aged Black and Tsukineko- Silver

So here's how I made this card.....first I applied the Wild Honey Ink to the area that I wanted my moon, then I used my punch and some repositionable adhesive and covered it up, then I used my new fall Distress inks on the background with the blending tool. Then I removed my mask and stamped the bats. Then using my versamark, I stamped the cobwebs and embossed with the silver EP. I die cut the tree and used the Walnut Stain EP on it. I die cut the fence and used the Weathered Wood and Black Soot Ink on it, then I covered it with the Crackle Paint. I stamped and embossed the cat with the Aged Black EP and fussy cut it out. I stamped the saying and used the Wild Honey and the Seedless Preserves with the blending tool, then I covered this with the distress stickles. Now all that's left is to put it together!!! I hope you all enjoyed my Halloween card............so that's all for this time.............until next time........Have a great week!!!

Don't forget that the Scrapbooker's Paradise Online Store is offering free shipping for order's over $50 until October 31st, 2011 
Shipping order total calculated before GST. Offer valid only within the ten Canadian provinces. Orders destined for Labrador, Nunavut, Yukon, NWT, United States and abroad will be charged the actual shipping amount.

Sunday, October 16, 2011

Featured Product Post and Another Giveaway!!!

Hi all...........well it's that time again for another Featured Product Post and this time it's...........Copic Markers!!! So if you would like to win one, scroll down to the bottom of this post and I will tell you how........so this time instead of colouring with my Copics I decided that I would try stamping.........I hope you all enjoy what I came up with!!! You can also check out what Laura did on her blog, I'm sure you will love it!!!

Products Used
Copic: Sketch Markers YG99 and R39, Copic Blending Solution

I really love the look of the copics when you stamp with them, so to stamp with your Copics, first put some Blending Solution in a Mini Mister, then with your Copic Markers colour up your stamp. Once you are done, spritz your stamp with the blending solution and then stamp it right away. I will warn you though, this may stain your stamp but I think that it's worth it!!! I also used the Scor Tape and the glitter over the stamped image, but the glitter never shows up well for the camera :) I added the rosette, some ribbon and the 25 die cut and that's pretty much it for this card.

So I did say that there's a giveaway.........would you like to win one of the Copic Markers??? If so head on over to the Scrapbooker's Paradise Blog and leave a comment on the Featured Product Post you have until October 31st to enter your comment.

Don't forget to check out what Laura did with the Copics.......so until next time.........have a great week!!!

Sunday, October 9, 2011

It's a Blue Blue Christmas!!!

Hi all, well it's sure starting to feel like the cold weather is coming......I'm hoping that we will get some warmer days before the dreaded white stuff shows up!!! I really could live without the cold! :)
So onto today's post.......I actually tried to keep it simple......so here's what I came up with.............


Products Used
Cardstock: White and Dark Blue

So here's how I made this card......I used the embossing folder on the white cst, then I used the blending foam and all the distress inks, starting with the lightest at the top. Then I used the white ink and the white embossing powder on the raised areas. Stamped the snowflakes with the distress ink. Then I stamped the sentiment with the white ink and embossed it with the white embossing powder. Adhered it to my dark blue cst and added some bling. So that's all for this card...............I hope you all have a very HAPPY THANKSGIVING!!! Until next time............

Don't forget when you shop at the Scrapbooker's Paradise online store that there's.......

Sunday, September 25, 2011

Birthday Flourishes

Hi all.....well it's time for another post and I used some of my favourite Distress Inks and it's in my favourite colour....Purple!!!


Products Used

Cardstock: Black, White and Ranger White Glossy Cardstock
Misc.: Maya Road Chipboard- Mini Scrolls and Mini Antique Keys, Tim Holtz Distress Embossing Powder- Dusty Concord, Tsukineko Clear Embossing Powder, Misc. Black Sparkle Embossing Powder, Ranger Perfect Pearls- Jewels, Basic Grey Basics Paper Ribbon Dollies, Ranger Ink Blending Tool and Misc. Rhinestone


So, I stamped the Flourish with Dusty Concord and then I stamped it again with Versamark and embossed with the clear EP. I used my distress inks and the blending tool for the background. I added the paper ribbon, which I used the Perfect Pearls on. Inked the mini scrolls with Versamark and used the Black Sparkle EP on them and then I did the key with the Black Soot and the Dusty Concord EP and adhered them all to the front. I cut the banner from the Glossy White CST, leaving the CST in the die, then I used the Blending Tool with the Milled Lavender. Stamped my sentiment with the StazOn and pop dotted it on my card. Added the rhinestone to the key and that's it for this card, so...........until next time!!! Have a great week!!!

Sunday, September 18, 2011

Happy Halloween and Flying Crows!!!

Hi all, so it's time for another post..........so I figured I would do a Halloween Card, since it won't be much longer before Halloween is here! So I hope you all enjoy today's post...........I had fun making it!!!


Products Used

Cardstock: White, Black and Purple
Stamps: Stampendous Cling- Crowscape and Tim Holtz Mini Halloween
Ink: StazOn Jet Black, Tim Holtz Distress Inks- Dried Marigold, Spiced Marmalade, Milled Lavender and Dusty Concord and Versamarker

So here's how I put this together.....I used the blending tool with all of the distress inks to create the background, then I sprinkled some water on it to make the inks react. I stamped the crowscape stamp with the StazOn, then I sprayed it with the Perfect Pearls Mist and of course the pearly sheen doesn't show up on the pic! :) I really wanted the crows to stand out, so I used my Versamarker and coloured them in and used the Aged Black Embossing Powder. I absolutely love the new Stampendous Powders!!! For the sentiment I used the 2 distress inks and then I stamped the sentiment with the StazOn, then I added the lace to the bottom of the sentiment and that's pretty much it for this card. So I hope you all enjoyed my Halloween Card.............until next time.

Don't forget that if you order from the Scrapbooker's Paradise Online Store you will receive FREE shipping on orders over $50 placed before September 30th, 2011. 

Shipping order total calculated before GST. Offer valid only within the ten Canadian provinces. Orders destined for Labrador, Nunavut, Yukon, NWT, United States and abroad will be charged the actual shipping amount.

Thursday, September 15, 2011

Featured Product Post and a Giveaway!!!

Hi all, well it's time for another giveaway on the Scrapbooker's Paradise Blog..... scroll down to the end of my post for the deets............So the featured product is...................Tattered Angels Glimmer Mists!!! So here's what I did........and don't forget to check out what Sara did with the Glimmer Mist, check it out on her blog here.


Products Used:
Cardstock: White & Black
Ink: Versamark and Ranger Black Archival Ink

So I used the butterfly template and the acrylic dabbers on the white cardstock, then sprayed the glimmer mists over top. The acrylic paints actually resist the glimmer mists, so you can create some really awesome backgounds with them! Then I cut the tag out of the black cardstock with the Spellbinders die and used my versamark and clear embossing powder over top. I sprayed the glimmer mists onto the white cardstock and stamped my sentiment with the archival ink. Then I added some pearls to the flowers. That's it for this card......I hope you all get out your glimmer mists and play, it's so much fun!!!

So who would like to win one of the Tattered Angels Glimmer Mists??? All you have to do is leave a comment on the Featured Product post on the the Scrapbooker's Paradise Blog.

Dont' forget to check out Sara's blog!!!

If you want to pick up some of the Glimmer Mists they are on sale for 7.50 (Reg. $8.99) from Sept 16th until Sept 30th.  Click here to go shopping at the Scrapbooker's Paradise online store! Just use the Featured Product code FIGM in the comments section when you check out.

Well that's all for this time...................until next time, have a great week!!! 


Monday, September 5, 2011

Fabulous Florals


Hi all.........well it's time for another Showcase Monday and this time we are doing Fabulous Florals.....I decided to go with a fall theme and made a card.......


Products Used:
Cardstock:Brown, Orange, Green and Imaginisce Happy Harvest 12x12 Patterned Paper
Misc: Cuttlebug Polka Dots Embossing Folder, Imaginisce Happy Harvest Sticker Stackers and Brown Satin Ribbon

So all the flowers on this card are made with the Carnation Dies and the Happy Harvest paper. I cut them out 2 or 3 times in different sizes, I also shaped the petals on all of the flowers......I love to make my own flowers and you can make them any colour or size that you want. I used the Polka Dot folder on the orange cst and layered the Happy Harvest on top, then added my ribbon and a bow. I used the mini Flourish die and cut out 2 of them and adhered them to the right corner, then I added all my flowers. Do did you notice???? There's actually no stamping on this card!!! I used one of the Stickers that goes with this line. Well that's pretty much it for this card.........I hope you all enjoyed my version of Fabulous Florals............so until next time...............have a great week!!!

Tuesday, August 30, 2011

Faux Mosaics Card

Hi all, so it's time for another tutorial over on the Scrapbooker's Paradise Blog and I decided to do Faux Mosaic Tiles. So make sure that you check out my tutorial here. This is a really easy way to create a tiled look without using tiles!!! So here's how I used my piece from the tutorial................


Products Used:

Cardstock: White, Black, Pink, Basic Grey Out of Print 12"x12" Papers- Etchings and Headlines

So for this card I actually sprayed the tiles with the Perfect Pearls Mist- Perfect Pearl (of course this doesn't show up on the pic) and then added the seam binding ribbon and bow, which I coloured with the Tim Holtz Distress Stain- Spun Sugar. I stamped the saying with the Lipstick Pink and embossed it with the Black Soot EP. Then just did some, well a lot of layering with the Out of Print and cardstock. I also used the Cherish Punch on the pink cardstock and patterned paper and then layered them and of course it needed some bling! :-) That's pretty much it for this card...........I hope you check out my tutorial and enjoyed my card...........till next time.......