Wednesday, December 22, 2010

A Glittery Merry Christmas!!!

Hi all, well I have one last christmas card to share.........It's a fairly quick and easy card, so I hope you all like it!!! So just in case I don't get to post again before the new year starts, I want to wish all of you a
Merry Christmas and a Happy New Year!!!


Products Used

Cardstock- Red & Green
Glitter Ritz-Warm Highlights Glitter
Distress Inks-Bundled Sage, Forest Moss, Fired Brick & Aged Mahogany
Misc. Red Rhinestones

I absolutely love the glitter on this card, this is one of my favourite techniques, I think it just makes the
card so pretty......and of course it doesn't show up like it looks!!!   So here's a short version of how I made it........I brayered the glossy cardstock with all the distress inks, then used my Scor Tape for the adhesive and burnished the glitter on. Once that was done, I stamped the Christmas Text Stamp with the StazOn and cut it out with my Labels 8 die. Added a bow and then of course, I just had to add some bling........so I used some red rhinestones. That's pretty much it for this card. These would be quick to make if you need a few extra cards for Christmas and I still have a few cards to make......lol.....I should have them done by Christmas!

So don't forget about our Playing in Paradise Sketch Challenge.......you have until Dec. 31st to play, we would love to see what you all come up with!!!

We also have FREE SHIPPING going on until Dec. 31st on all orders over $50 at Scrapbooker's Paradise Online Store!!!

Friday, December 17, 2010

It's Time for another, Playing in Paradise Sketch Challenge #3

Well are you ready to play along with us? For this one Becky Fleck created a sketch for us and is suppling us with a sample. Also, we will be giving away her new Page Maps book ........isn't that awesome!!! So here's the sketch's for this one:
Card

Scrapbook Page

So here's my take on the sketch and yes I did a card.......lol


Products Used


Now a little bit of the deets......the main thing I did with this card is I used my new cherish punch and on the Butterfly embossed cardstock and then I stitched it with the black floss. I really love this punch!!! It gives you evenly spaced holes, so you could leave it as is or do what I did and stitch it! I was actually surprised that the stitching didn't take as long as I thought it would and it just adds so much to the card.

Then I stamped the Kids at Play set and embossed it with the Black EP. I used the Spellbinders die and cut 2 of them, this die has always reminded me of clouds, so I hope that you think so too!! I hope you all enjoyed my version of the sketch, thanks for stopping by and checking it out!!!

Now go and check out what everyone else has done:


Head on over to the Scrapbooker's Paradise Blog to check out all the photos and new products.........and don't forget that Scrapbooker's Paradise Online Store is offering FREE SHIPPING on orders shipped before Dec. 31st!!

Don't forget to if you would like to win some blog candy head over to the Scrapbooker's Paradise Blog and leave a comment on the post for the Feature Product.......a winner will be randomly chosen on Monday Dec, 20th!!!


Thursday, December 16, 2010

Scrapbooker's Paradise Feature Product Post and A Surprise????

Hi all.......well guess what, it's time for another feature product post! Don't forget to scroll down for the surprise..........and the feature product is...........Colorbox Cat's Eye Queue's, so I decided to make, as you probably have already guessed...........a card.......lol.....or should I say 2 cards........


The only difference between the two cards is that on the first one I decided to cut out the holly berries..........

Products Used

Cardstock: Linen, Green & Red
Strathmore Watercolor Paper
Colorbox Cat's Eye Queues- Beach Towels & Pool Party
Sakura Koi Waterbrush #2 Small & #6 Medium
Creative Imaginations Radiant Rain Shimmering Mist- Egyptian Gold

So all I did was stamp with Red Devil and Golf Course from the Cat's Eye Queue's on the cardstock with the holly stamps from Stampendous, then sprayed it with the Shimmering mist. I stamped the Holly Berry stamp with the gold on watercolour paper and embossed with gold embossing powder. Now the fun part.....I coloured the holly in with the Cat's Eye Queue's and the waterbrushes, I love this technique it's soo much fun to do and a easy way to add some colour to your stamped images!!! If you haven't tried it, you should give it a try!!!

Well that's it for these cards......bet you thought I forgot about the surprise.........lol..........

BLOG CANDY!!!! BLOG CANDY!!!! BLOG CANDY!!!! DID I SAY BLOG CANDY!!!

well if you would like to win our featured product head over to the Scrapbooker's Paradise Blog and leave a comment on the post for the Feature Product.......a winner will be randomly chosen on Monday Dec, 20th!!!

Now head on over to see Sara's Blog to see what she's done with the feature product!!!

So while you're shopping at Scrapbooker's Paradise........pick up our Featured Product the Colorbox QUEUE they are on sale for $9.50 (Reg $11.99) from Dec 16th-31st. Just use this code:FIQUE in the comments section!!!

Monday, December 6, 2010

Good day all!!! So is everyone ready for Christmas? I still have shopping to do........but I did mange to get my parcel mailed out to my parents......so they should have it in plenty of time for Christmas!

Well, on to today's post.........since I always do cards, I decided it was time to show you that you can make some really awesome gifts for Christmas, so I hope you all enjoy today's post..........

Here's my version of a Tim Holtz necklace.............anyone that knows me, knows that I have most of his products, I do buy double, sometimes even triples........lol.......I do love my Tim Holtz products.........


So bear with me this is a rather long list of products that I used to make this.........I will give you a brief tutorial after the Products Used...............

Products Used
White Cardstock
Spellbinder's Scalloped Rectangles Large
Alcohol Inks in the following colours: Eggplant, Stonewashed & Silver

Whew........that's a long product list for such a small item.........lol. Okay onto the how to make it part.....

I cut my bead chain so it's 20" in length, then I cut my acetate sheet so it was 1 7/8"x 1 7/8" and applied the alcohol inks on it. Now cut the butterly from the 7 Gypsies pad with the scalloped rectangles die and apply a fairly thick coat of the crackle accents over it, (BTW, I love this stuff....its amazing) set aside to dry......FYI...this takes awhile to dry, but once it's dry, apply the vintage photo distress ink to it so it gets into the cracks and wipe with a paper towel.

I made a small tag myself from white cardstock and used the dusty concord distress ink on it and applied the word Love from the Cosmo Cricket stickers. I stamped the Technique Tuesday Verbose stamp on the back of the glass and let it dry. Just so you know....the reason that I used the acetate is that the alcohol inks will react with the StazOn and you will end up with a mess!!! Now, distress the ticket with Tumbled Glass, Chipped Saphirre & Vintage Photo and using your finger rub some rock candy on the word and dry. Here's a close up it in the frame...........


Onto the assembly.......I used the glossy accents to adhere the acetate and then adhere the rest of the embellishments. I then applied the glossy accents to all the sides of the glass and sprinkled on some glitter. Put the front piece on while it's still wet, this will seal the 2 pieces of glass together and spread the glitter somewhat. Put in the frame and let dry. Attach the charm clip to the bottom and add the word key. Since I put the hole to the bottom.....I attached the hinge clip to the top and added a jump ring. Now you can hang it on the beaded chain. Voila a beautiful gift for someone!!!

I hope you enjoyed my project...sorry if it's a bit long, but I thought that I would give you somewhat of a tutorial, as the pics do not do it justice, it's so hard to show the glimmer. I would love to hear your thoughts......so please leave a comment..........don't be shy!!!

DON'T FORGET..........Scrapbooker's Paradise has FREE SHIPPING on all orders over $50 shipped before Dec. 31st!!!

Thursday, December 2, 2010

Dec 9th Toonie Thursday at Scrapbooker's Paradise Red Deer

Just a quick post......here's my Toonie Thursday Project for Dec. 9th......

So come to the Red Deer Scrapbooker's Paradise on Dec 9th between 11 and 4 and for a Toonie you can make my Tim Holtz Inspired Tag and you get to play with his products!!! Hope to see you all there!!! Have a great weekend!!!

Sunday, November 28, 2010

Falling Snowflakes................

So I hope everyone is having a great weekend!!! I'm not one that particularly likes the cold, so I am soooo happy that it's finally warming up here.......now, if only it would stay like this for the whole winter I would love it!!! Well, I have another card for you and I couldn't resist using some more of my Bo-Bunny Midnight Frost Paper.......this has to be one of my favs this year, so here's another card done in the blues..........


Products Used:

Cardstock: Navy & White
Misc.: We R Memory Keepers Sew Easy- Stitch Piercer, Burst Stitch Piercer, Mat & Blue Floss American Craft Ribbon Satin with White Dots Denim Ribbon

This is a fairly quick card to make, I think doing the stitching took the longest.......I used the Burst to do the stitching and I only used 3 of the strands for the stitching. I stamped the snowflakes and embossed the patterened paper with clear EP. Die cut the snowflakes and use the Crystal EP on the navy cardstock and used the winter wonderland EP on the white cardstock..........this really does shimmer more than in the photo, I really wish I could capture it on the camera!!!

Here's a close up of the snowflakes..........


I absolutely love this set from Flourishes......I kinda designed the card around the snowflake sentiment.......it's just too cute!!! Then, I added some ribbon and bling, that's pretty much it for this card, So are you all ready for Christmas? I'm getting there, still have some giftys to buy and cards to mail........they should get them in time for Christmas.........lol.........Have a great week!!!

Don't forget to enter our Sketch Challenge.......we would love to see what everyone comes up with!!!

Also, your favourite online store, Scrapbooker's Paradise is offering FREE SHIPPING on all orders over $50 shipped before November 30th, 2010

Friday, November 19, 2010

Playing in Paradise Sketch Challenge #2

Hi everyone.....it' s time to see what the sketch for this month is and I hope you all will play along, you have until Nov 30th to play with us.........
Card Challenge


Scrapbooking Page Sketch

So you can do either one............or both if you wish!!! I decided to do the card.............scroll down to the end of my post and check out what all the other gals have done, just click on the links and it will take you to their blog........


Products Used:

Prima Fairy Flora 6"x6" Paper Pad
Copic X-press It Cardstock
Purple & Green Cardstock
Ranger Sticky Back Canvas White
Justrite- My Garden Set
Craft & Glitz Glitter- Lavender
In The Making Glitter- Cool Highlights
Stampendous Embossing Powder- White Pearls
Momento Tuxedo Black
Distress Ink Pad - Milled Lavendar
Crafter's Workshop 6"x 6" Template- Mini Cosmic Swirls
Copic Markers in the following colours: V17, V15, V12, YR18, Y17, Y38 & 0(Colorless Blender)
Spellbinders Dies: Standard Circles LG & Scalloped Circles LG
Cuttlebug Embossing Folder- Polka Dots
Harmonie Chipboard Butterfly
Kaiser Craft Silver Rhinestones
Distress Stickles- Rock Candy
American Crafts- String Caramel
Buttons

So here's how I put it together..............I used the paper from the Prima pad and embossed it with the Polka Dots folder, then layered the green cardstock and a strip from the Prima pad and then the Purple cardstock.  I stamped the image and sentiment from the my garden set and cut them out with the Spellbinder's dies. Coloured the image with my Copics and used the distress ink on the sentiment. Adhered them all to the scalloped circle.

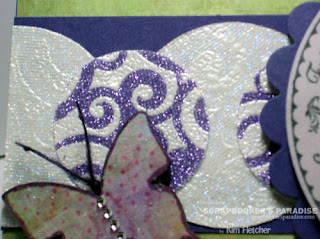
Now for the fun part.......I just had to try a new technique......I cut the circles from the Sticky back canvas and used the sticky side of it and put my mini cosmic swirls template on it and applied the embossing powder, then I peeled off the template and heated the embossing powder. Then you apply the glitter. I just love this technique!!! Here's a close up of what it looks like...........it is more glittery in person..........


So now I glued the Prima paper to the butterfly and trimmed, I used my Copic to go around the outside of the butterfly and to colour the string. Threaded the buttons on and made some antennas and glued the butterfly on to my card. Now what's a card without some bling..........lol...............so I added the rhinestones.

So now check out what everyone else has done with the sketch and say hello while you're there...........


Linda Carson

Also check out our Scrapbooker's Paradise Blog for lots of great ideas and inspiration!!!!

Don't forget that Scrapbooker's Paradise has free shipping until the end of November....... and our Stampavie stamps are 15% off from Nov 16-30. Quote STAMPAVIE in the comments section of your order form. Head on over to Scrapbooker's Paradise to do some shopping, there's loads of great products!!!


Tuesday, November 16, 2010

Stampavie Stamp Challenge!!!

Hi all, today is my feature post for Scrapbooker's Paradise.......and the feature is Stampavie Stamps......so I picked a cute christmas stamp with an adorable Teddy Bear!!! I love how this turned out.......I did something different with my copics and a snow marker, I hope you like it, see below for products used and a short tutorial..........
Products Used
Cardstock- Red, Dark Aqua and X-Press It Copic
Paper- Harmonie Noel-Rudolph
Copic Markers:Y08, YR65, YR68, R35, R37, G17, BG10, BG11, BG13, BG18, E71, E74, E77, W00 & W1
Copic Atyou Spicas: 21 Lipstick, 00 Clear & 11 Gold
Spellbinders Dies: Grand Labels 1 & Labels 8

Stampendous Embossing Powder-Stardust

I just had to try the new Grand Spellbinders..........so you can use them in your Cuttlebug, Big Shot etc., you just can't use all of them depending on your machine, I found that the Big Shot will do more of the dies than the Cuttlebug or the Wizard, just because it has a wider platform. These dies are great for making your own shaped cards, so if you don't mind not being able to use a couple of the larger ones.....you just have to try them!!! So onto my card........I folded my cardstock in half and cut with the Grand Labels die.

I cut embossed and layer the harmonie paper, then I punched the Double Arches punch on both sides of the cardstock.......I love these punches soo many fun things you can do with them. After I did the punching I cut it with the die. Now I decided it need a little something......so I used the versamrk and the stardust embossing powder on the punched part. I pop dotted this to the card.

Onto the stamped image......I stamped with the Momento and coloured it in with my Copics, Snow marker and Spicas. How did I do the teddy???....I used the snow marker on him and then coloured him with the Copics.......then heated it with my heat tool. This made the image puff up and give him some texture......then I added some more colour with my Copics. I thought that this made him look adorable.

I used flocking on the little birdie and the snow marker on his hat. Pop dotted the flower and added some gold flower soft. Cut out with the die and then added some rhinestones. Stamped and embossed the sentiment with the stardust EP and that's it!!! I hope you enjoy my card and have a super week!!!

Now check out Sara's Blog to see what she has done with her image!!! Head on over to the Scrapbooker's Paradise Blog to see all of our projects!!! While you're there sign up for our emails so you don't miss out on all the awesome projects, tutorials etc......


Head on over to the Scrapbooker's Paradise Online store to take advantage of the FREE SHIPPING on all orders over $50 it has been extended until November 30th, 2010!!!

Sunday, November 14, 2010

Hubby's Birthday Card!!!

Here's a card that I made for my Hubby's Birthday.............

and this is the verse on the inside of the card............he just loved the card and couldn't stop laughing........I guess I picked the right saying.........lol
I really love this verse and image........the stamps are from Gina K and I coloured it in with my Copics of course!!! The old guy reminds me of Fish from the Barney Miller show, hmmmmm.......now that's really showing my age.......lol.......so anyways I decided that since he looked like Fish I would colour him like Fish!!! The rest of the card is just layering and some Spellbinders dies. Well, that's it for this post.........till next time...........

Sunday, November 7, 2010

Happy Holidays with a Flourish!!!

Hi everyone, I hope you are all having a great weekend!!! Here's another Christmas card that I made......I decided to use one of the Flourish stamps that match the Spellbinder's Labels 14 die and use some of my Copics...........


Products Used

Aqua & Burgundy Cardstock
Harmonie Noel Ornaments Cardstock

So, this is how I put the card together:

I used the aqua cardstock as the base for my card, then layered it with the burgundy cardstock which I just had to use the double loops punch on. I love this punch!!! It is so versatile and you can use it for just about any card.  Then I layered the Harmonie Ornaments cardstock. Oops, I almost forgot.....I did add the ribbon and bow before I adhered it to the aqua cardstock.

Now, I coloured in the stamp from Flourishes with my Copics on the new X-Press It cardstock.......if you have Copics you really need to try this new cardstock, it is amazing!!! I find the blending is so much easier and it is soooo smooth. Then I airbrushed it, after I cut and embossed it with the Labels dies.

Then cut and emboss the aqua cardstock out of the Labels die and mist it with the Perfect Pearls Mist......this stuff is awesome.....it gives it a pearlized finish, which is really hard to catch with the camera. Stamped the sentiment on it and pop dotted the stamped image to it. Added some rhinestones which I coloured with my Copics and voila......finished!!!

Don’t forget Scrapbooker’s Paradise has:
FREE SHIPPING on all orders over $50 shipped before November 30th, 2010


Tuesday, November 2, 2010

Paper Stripping with Bo Bunny


Hi everyone........today is Technique Tuesday and I have a awesome technique for you........I call it Paper Stripping.........lol.........I hope you all enjoy it!!!

And here's the card I made using the Bo Bunny's new Midnight Frost Papers...........love these papers!!!


Front View

Side View


Products Used

Cardstock- Navy and Light Blue
Flourishes A Gift For You Clear Stamp Set


1. Here's the papers I chose for this card. Cut the Light Blue Cardstock to 6"x12" and score with your scor-pal at 6". Then cut a piece of the navy cardstock (approx. 5"x 5") and apply the scor-pal tape to it and trim to 4.5"x4.5". This will be the piece that we will do the paper stripping on.

2. Cut the Bo Bunny 6"x6" Paper into 1/4" strips. I cut 5 of three colours and it was enough to do the navy piece.

3. Remove the top liner from the scor-tape. Apply the 1/4" strips to the middle of the navy cardstock using the scor-pal grid on the mat as a guide. You should have the same as in the photo.
4. Now add the strips of the Bo Bunny Paper, alternating the patterns. Trim pieces as you go and use them.
5. Continue alternating the paterned paper.
6. This is how it should look when you are finished. Now cut and embooss it with the largest of the Spellbinder's labels 16 dies.
7. Stamp the Bo Bunny Stamps with the Chipped Sapphire and emboss with clear embossing powder on the front of the card.
8. Cut the navy cardstock with the largest and 3rd largest die from Spellbinders Labels 15. Cut 2 of these. Now cut the Bo Bunny Snowfall paper with the 2nd largest and 3rd largest of the Labels 15 dies. Cut 2 of these. Glue as in the photo. 1st frame is glued on the card, the 2nd frame is pop dotted.
9. Pop dot the paper stripped piece in the center of the frames.(I used 3 high) Now, stamp on the light blue cardstock using Season's Greetings from the Flourish set. Stamp using the chipped sapphire and emboss with clear embossing powder. Cut out with Labels 15 smallest die and ink the edges. Pop dot in the center. Also, ink the edges of the card. Last but not least, time to add some bling , so add the silver rhinestones.
That's it for this Technique Tuesday............I hope you make many of these cards.......the possibilities are endless.

Monday, October 18, 2010

Twinkling Metallics

Hi everyone, hope you all had a great weekend!!! I got a chance to pull out my Twinkling H2Os this weekend and I decided that I would play with them to see what I could come up with.......I really like how it turned out, I hope this will inspire you to give them a try, they are amazing and you can do so much with these incredible paints, I just love all that shimmer!!!

So without further ado..................my card..........


Products Used:
Creative Imaginations Twinkling H2Os - Bronze, Egyptian Gold, Solar Gold, Indian Copper, Scarab Beetle & Heavenly
Cardstock - Black, Brown & Metallic Bronze

Playing with the paints was so much fun, which actually made me decide to do something different, I am used to stamping a image and colouring it in, but this time I decided to use a large flat paintbrush and paint randomly over the black cardstock to create a background. Once I was done I spritzed the cardstock with some water and then used the heavenly colour with a stencil brush and pounced it all over to create a splatter effect. I absolutely love how it turned out.....so I decide to make it a simple card and show off the background. For some reason simple is not easy for me, I love to do lots of different things on my cards and for me it is hard to stop and just leave this as it is, but I did. 

The rest is easy, I cut the metallic bronze paper out of the 2nd smallest Labels 8 die and then cut the black cardstock with the smallest of the Labels 8 die and stamped the sentiment with the copper ink. Then add the ribbon and pop dot the sentiment.

Also, check out our Specials that are on right now at Scrapbooker's Paradise they are......Featured Product, Distress Inks are reduced to $5.25 until the end of the month (quote Distress Ink Feature in the comments section).  All adhesives are 15% off until Oct 20, (quote 10100713 in the comments section of your order).  And there is FREE SHIPPING on orders over $50.00 until October 31st.

I hope you all had a great weekend and if you enjoyed this mini tutorial or just have a question.....please leave me a comment!!! Thanks for looking!!!


Saturday, October 16, 2010

Distress Ink Feature and a Tim Holtz inspired Tag!!!

Here's my tag that was inspired by Tim Holtz...........

Since our feature item on Scrapbooker's Paradise is Distress Ink (see below this post to see how you can save some $$$ if you want to purchase the inks) I just had to make something with almost all of Tim Holtz/Ranger products! I absolutely love anything Tim!!!! So I decided to make one of his famous tags, I hope you all like it!


and here's a close up............


Products Used:

Ranger Distress Inks in the following colours: Spiced Marmalade, Stormy Sky, Dusty Concord, Pumice Stone, Weathered Wood and Black Soot
Tim Holtz Shabby French Unmounted Stamp Set (please note: if you are looking for any of his sets online they are under the manufacturer Art Gone Wild)

Here's a mini tutorial of how I made this tag:

Use your ink blending tool to apply the Spiced Maramlade, Stormy Sky and Dusty Concord Distress Inks to the tag. Emboss with the Poison embossing folder and use the Black Soot Distress Ink with the blending tool to highlight the raised areas of the embossing.

Stamp the bird image in Black Soot and emboss with clear embossing powder. Cut out the bird with your scissors. Cut the On the Fence die and leave a small border at the bottom and using the blending tool, blend Pumice Stone, Weatherd Wood and Black Soot Distress Inks onto the fence.

Cover the key with Dusty Concord Distress Ink and emboss with the Dusty Concord Distress Embossing Powder. Cut out the Pumpkin from the Graphic 45 border, leave it just a little bigger that the facet and adhere with the Glossy Accents. Trim the excess paper off.

Add the jump rings to the key and facet. Pop dot the fence onto the tag and then the bird to the fence. Run the black organza ribbon through the jump rings and glue to the back of the tag.

Well that 's it.......for this time.

Now, head on over to Sara's blog to see what she has done with the Distress Inks.......it's amazing!!!

Also, check out the Scrapbooker's Paradise Online Store and the Distess inks are on sale!!! They are reg. $6.50 featured at $5.25, just quote Distress Ink Feature in the comments section to get your discount!!!

Don't forget.....there's Free Shipping this month on orders over $50.00 and Adhesives are 20% off Oct 14-20 and while you are there sign up for the blog feed and newsletter!


Have a super weekend!!!


Friday, October 15, 2010

Playing in Paradise Sketch Challenge

So who's up for a challenge???

Card Layout 


Scrapbook Layout


So here's my take on the Card Layout.................more details below.....


Products Used:


Copic Markers in the following colors: W3, W5, W7, W9, 110, RV 10, RV11, RV17, RV19 & RV34
Cardstock in the following colours: Black & 2 colours of Pink

Okay so now on to the details of how I made my card..............

I cut my card so it's a 6"x6" card and rounded all the corners. The next part is to use paper from the DCWV paper pad with the Edger medallion chain punch,  the Decorative Flourishes die, Butterflies 2 and the 2nd largest die from Labels one. Oh and I also cut a strip for glueing on the dark pink cardstock.  I then die cut the largest die from Labels One with the dark pink cardstock and die cut the lighter pink cardstock with Decorative Label 4. Now you can stamp the saying from the Life Lines set with the black ink onto the lighter pink cardstock.

Okay I just have to say this...............I just love my copics.......what a great way to make matching embellies!!! So now you can play with your airbrush and copics........I used the prima flowers and airbrushed them with my copics..........what no airbrush???.......no worries, you can colour the flowers with your copics too.......but, I just have to use my airbrush, it's sooo much fun........but I think I over did it and I made too many flowers, but that's fine, I'm sure I can use them on another card.........lol......

Now just use your pop dots and adhesive and adhere everything! Lastly use your I-Rock tool and attach all those gorgeous rhinestones. That's it!!!

Well I hope you enjoyed my attempt at a short tutorial..........please feel free to leave me comments, I greatly appreciate them!! Thanks for looking!!!

Don't forget to check out what all of the Scrapbooker's Paradise Design Team has done with these sketches!!! Here's the link back to the Scrapbooker's Paradise Blog