 |
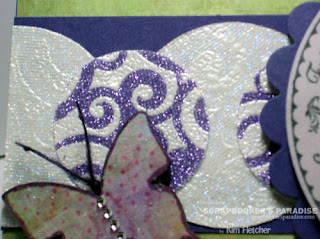
| Card Challenge Scrapbooking Page Sketch So you can do either one............or both if you wish!!! I decided to do the card.............scroll down to the end of my post and check out what all the other gals have done, just click on the links and it will take you to their blog........ Products Used: Prima Fairy Flora 6"x6" Paper Pad Copic X-press It Cardstock Purple & Green Cardstock Ranger Sticky Back Canvas White Justrite- My Garden Set Craft & Glitz Glitter- Lavender In The Making Glitter- Cool Highlights Stampendous Embossing Powder- White Pearls Momento Tuxedo Black Distress Ink Pad - Milled Lavendar Crafter's Workshop 6"x 6" Template- Mini Cosmic Swirls Copic Markers in the following colours: V17, V15, V12, YR18, Y17, Y38 & 0(Colorless Blender) Spellbinders Dies: Standard Circles LG & Scalloped Circles LG Cuttlebug Embossing Folder- Polka Dots Harmonie Chipboard Butterfly Kaiser Craft Silver Rhinestones Distress Stickles- Rock Candy American Crafts- String Caramel Buttons So here's how I put it together..............I used the paper from the Prima pad and embossed it with the Polka Dots folder, then layered the green cardstock and a strip from the Prima pad and then the Purple cardstock. I stamped the image and sentiment from the my garden set and cut them out with the Spellbinder's dies. Coloured the image with my Copics and used the distress ink on the sentiment. Adhered them all to the scalloped circle. Now for the fun part.......I just had to try a new technique......I cut the circles from the Sticky back canvas and used the sticky side of it and put my mini cosmic swirls template on it and applied the embossing powder, then I peeled off the template and heated the embossing powder. Then you apply the glitter. I just love this technique!!! Here's a close up of what it looks like...........it is more glittery in person.......... So now I glued the Prima paper to the butterfly and trimmed, I used my Copic to go around the outside of the butterfly and to colour the string. Threaded the buttons on and made some antennas and glued the butterfly on to my card. Now what's a card without some bling..........lol...............so I added the rhinestones. So now check out what everyone else has done with the sketch and say hello while you're there........... Linda Carson Also check out our Scrapbooker's Paradise Blog for lots of great ideas and inspiration!!!! Don't forget that Scrapbooker's Paradise has free shipping until the end of November....... and our Stampavie stamps are 15% off from Nov 16-30. Quote STAMPAVIE in the comments section of your order form. Head on over to Scrapbooker's Paradise to do some shopping, there's loads of great products!!! |
Welcome to my Kreative space!!! I hope you will find some inspiration and enjoy all of my creations.
Friday, November 19, 2010
Playing in Paradise Sketch Challenge #2
Hi everyone.....it' s time to see what the sketch for this month is and I hope you all will play along, you have until Nov 30th to play with us.........
Labels:
Copics,
Crafter's Workshop,
Cuttlebug,
Distress Ink,
Glitter,
Justrite,
Prima,
Ranger,
Sketch Challenge,
Spellbinders
Subscribe to:
Post Comments (Atom)


4 comments:
This is SO PRETTY! You put so much into this one card! My favorite part is the buttons on the butterfly trail! How creative is that? Thanks so much!...Nancy :o)
Gorgeous...and what a cool idea with the glitter. I never would have thought to work with the back side! Beautiful card!
So pretty, love the technique!
Very pretty card, Kim! Love what you did with the sticky-bach canvas!
Post a Comment