Sunday, October 30, 2011

Poinsettia with a Shimmer

Hi all, wow this month sure has gone fast.......it's almost November and soon it will be Christmas!!! So is anyone actually ready for Christmas? I know I'm no where near ready!!! When you think about it, there's really not much time left, I guess I had better get busy and start doing some of the Christmas gifts that I want to make!!! ....So while I am on the subject of Christmas......I thought I would make a Poinsettia card, this is from the new Penny Black stamps that we got in! 


Products Used
Cardstock: Burgundy, White and Gold Shimmer
Ink: Versamark
Misc.: Cuttlebug Embossing Folder-Holly Stripes, Tsukineko-Gold Embossing Powder, Copic Marker- R89, Distress Stickles-Aged Mahogany and misc. pearl flourish

So I stamped the poinsettia 3 times with Versamark and then embossed with the gold EP and fussy cut it so that I was able to layer the 3 sizes of petals and then coloured them all in with my Copic marker, then added the distressed stickles to the petals. Pop dotted the Poinsettia over the 3 panels that I embossed with my folder and cut. Stamped and embossed the sentiment and added some pearl flourishes that I coloured with my Copic Marker. So that's it for this card...........the poinsettia and the gold shimmer paper look so much better in person!!! Well I hope you all have a great week and a Happy Halloween!!! Until next time...................... 


Monday, October 24, 2011

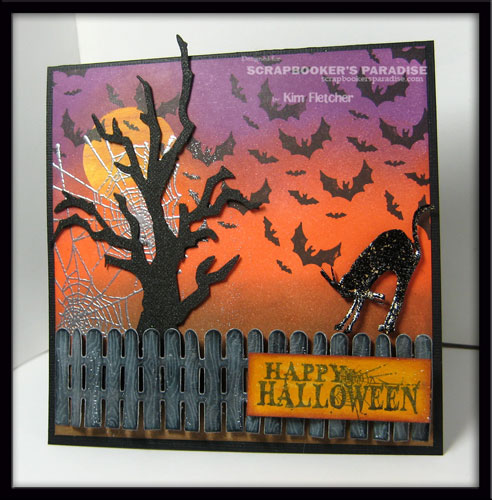
It's a Spooky Halloween Card


Hi all, so it's another Showcase Monday........and I really wanted to play with my new Tim Holtz Seasonal Distress Inks......I just love these new colours that he has out, I really hope you all bought yours, since they are limited and will not be out again until next year!!! But as you know I pretty much love anything Tim Holtz, so I just couldn't resist picking up his new colours!!! ;) So since Halloween is in the fall.....I did a Halloween card.........so this is what I came up with..........


Products Used
Cardstock: Black and White
Ink: Tim Holtz Distress Inks- Fall Seasonal Set, Weathered Wood, Wild Honey and Black Soot, Versamark and Versafine -Black Onyx
Dies: My Favorite Things- Fence and Tim Holtz- Branch Tree
Embossing Powder: Tim Holtz Distress- Walnut Stain, Stampendous- Aged Black and Tsukineko- Silver

So here's how I made this card.....first I applied the Wild Honey Ink to the area that I wanted my moon, then I used my punch and some repositionable adhesive and covered it up, then I used my new fall Distress inks on the background with the blending tool. Then I removed my mask and stamped the bats. Then using my versamark, I stamped the cobwebs and embossed with the silver EP. I die cut the tree and used the Walnut Stain EP on it. I die cut the fence and used the Weathered Wood and Black Soot Ink on it, then I covered it with the Crackle Paint. I stamped and embossed the cat with the Aged Black EP and fussy cut it out. I stamped the saying and used the Wild Honey and the Seedless Preserves with the blending tool, then I covered this with the distress stickles. Now all that's left is to put it together!!! I hope you all enjoyed my Halloween card............so that's all for this time.............until next time........Have a great week!!!

Don't forget that the Scrapbooker's Paradise Online Store is offering free shipping for order's over $50 until October 31st, 2011 
Shipping order total calculated before GST. Offer valid only within the ten Canadian provinces. Orders destined for Labrador, Nunavut, Yukon, NWT, United States and abroad will be charged the actual shipping amount.

Sunday, October 16, 2011

Featured Product Post and Another Giveaway!!!

Hi all...........well it's that time again for another Featured Product Post and this time it's...........Copic Markers!!! So if you would like to win one, scroll down to the bottom of this post and I will tell you how........so this time instead of colouring with my Copics I decided that I would try stamping.........I hope you all enjoy what I came up with!!! You can also check out what Laura did on her blog, I'm sure you will love it!!!

Products Used
Copic: Sketch Markers YG99 and R39, Copic Blending Solution

I really love the look of the copics when you stamp with them, so to stamp with your Copics, first put some Blending Solution in a Mini Mister, then with your Copic Markers colour up your stamp. Once you are done, spritz your stamp with the blending solution and then stamp it right away. I will warn you though, this may stain your stamp but I think that it's worth it!!! I also used the Scor Tape and the glitter over the stamped image, but the glitter never shows up well for the camera :) I added the rosette, some ribbon and the 25 die cut and that's pretty much it for this card.

So I did say that there's a giveaway.........would you like to win one of the Copic Markers??? If so head on over to the Scrapbooker's Paradise Blog and leave a comment on the Featured Product Post you have until October 31st to enter your comment.

Don't forget to check out what Laura did with the Copics.......so until next time.........have a great week!!!

Sunday, October 9, 2011

It's a Blue Blue Christmas!!!

Hi all, well it's sure starting to feel like the cold weather is coming......I'm hoping that we will get some warmer days before the dreaded white stuff shows up!!! I really could live without the cold! :)
So onto today's post.......I actually tried to keep it simple......so here's what I came up with.............


Products Used
Cardstock: White and Dark Blue

So here's how I made this card......I used the embossing folder on the white cst, then I used the blending foam and all the distress inks, starting with the lightest at the top. Then I used the white ink and the white embossing powder on the raised areas. Stamped the snowflakes with the distress ink. Then I stamped the sentiment with the white ink and embossed it with the white embossing powder. Adhered it to my dark blue cst and added some bling. So that's all for this card...............I hope you all have a very HAPPY THANKSGIVING!!! Until next time............

Don't forget when you shop at the Scrapbooker's Paradise online store that there's.......

Sunday, September 25, 2011

Birthday Flourishes

Hi all.....well it's time for another post and I used some of my favourite Distress Inks and it's in my favourite colour....Purple!!!


Products Used

Cardstock: Black, White and Ranger White Glossy Cardstock
Misc.: Maya Road Chipboard- Mini Scrolls and Mini Antique Keys, Tim Holtz Distress Embossing Powder- Dusty Concord, Tsukineko Clear Embossing Powder, Misc. Black Sparkle Embossing Powder, Ranger Perfect Pearls- Jewels, Basic Grey Basics Paper Ribbon Dollies, Ranger Ink Blending Tool and Misc. Rhinestone


So, I stamped the Flourish with Dusty Concord and then I stamped it again with Versamark and embossed with the clear EP. I used my distress inks and the blending tool for the background. I added the paper ribbon, which I used the Perfect Pearls on. Inked the mini scrolls with Versamark and used the Black Sparkle EP on them and then I did the key with the Black Soot and the Dusty Concord EP and adhered them all to the front. I cut the banner from the Glossy White CST, leaving the CST in the die, then I used the Blending Tool with the Milled Lavender. Stamped my sentiment with the StazOn and pop dotted it on my card. Added the rhinestone to the key and that's it for this card, so...........until next time!!! Have a great week!!!

Sunday, September 18, 2011

Happy Halloween and Flying Crows!!!

Hi all, so it's time for another post..........so I figured I would do a Halloween Card, since it won't be much longer before Halloween is here! So I hope you all enjoy today's post...........I had fun making it!!!


Products Used

Cardstock: White, Black and Purple
Stamps: Stampendous Cling- Crowscape and Tim Holtz Mini Halloween
Ink: StazOn Jet Black, Tim Holtz Distress Inks- Dried Marigold, Spiced Marmalade, Milled Lavender and Dusty Concord and Versamarker

So here's how I put this together.....I used the blending tool with all of the distress inks to create the background, then I sprinkled some water on it to make the inks react. I stamped the crowscape stamp with the StazOn, then I sprayed it with the Perfect Pearls Mist and of course the pearly sheen doesn't show up on the pic! :) I really wanted the crows to stand out, so I used my Versamarker and coloured them in and used the Aged Black Embossing Powder. I absolutely love the new Stampendous Powders!!! For the sentiment I used the 2 distress inks and then I stamped the sentiment with the StazOn, then I added the lace to the bottom of the sentiment and that's pretty much it for this card. So I hope you all enjoyed my Halloween Card.............until next time.

Don't forget that if you order from the Scrapbooker's Paradise Online Store you will receive FREE shipping on orders over $50 placed before September 30th, 2011. 

Shipping order total calculated before GST. Offer valid only within the ten Canadian provinces. Orders destined for Labrador, Nunavut, Yukon, NWT, United States and abroad will be charged the actual shipping amount.

Thursday, September 15, 2011

Featured Product Post and a Giveaway!!!

Hi all, well it's time for another giveaway on the Scrapbooker's Paradise Blog..... scroll down to the end of my post for the deets............So the featured product is...................Tattered Angels Glimmer Mists!!! So here's what I did........and don't forget to check out what Sara did with the Glimmer Mist, check it out on her blog here.


Products Used:
Cardstock: White & Black
Ink: Versamark and Ranger Black Archival Ink

So I used the butterfly template and the acrylic dabbers on the white cardstock, then sprayed the glimmer mists over top. The acrylic paints actually resist the glimmer mists, so you can create some really awesome backgounds with them! Then I cut the tag out of the black cardstock with the Spellbinders die and used my versamark and clear embossing powder over top. I sprayed the glimmer mists onto the white cardstock and stamped my sentiment with the archival ink. Then I added some pearls to the flowers. That's it for this card......I hope you all get out your glimmer mists and play, it's so much fun!!!

So who would like to win one of the Tattered Angels Glimmer Mists??? All you have to do is leave a comment on the Featured Product post on the the Scrapbooker's Paradise Blog.

Dont' forget to check out Sara's blog!!!

If you want to pick up some of the Glimmer Mists they are on sale for 7.50 (Reg. $8.99) from Sept 16th until Sept 30th.  Click here to go shopping at the Scrapbooker's Paradise online store! Just use the Featured Product code FIGM in the comments section when you check out.

Well that's all for this time...................until next time, have a great week!!!