Monday, August 8, 2011


Hi all....well it's time for another Showcase Monday on the Scrapbooker's Paradise Blog and this time we are doing Wonderful Whimsical Kids........so I decided to do a girl's birthday card and I wanted to do something kinda fun.......so here's my take on it.........

Here's the front of the card....................


and I actually even did the inside for this one.....................


Products Used:
Cardstock: Dark Purple, Light Purple and Kaiser Craft Magic Happens 6"x6" Paper Pad
Stamps: Flourishes- Kids at Play and Gina K Designs - Wishes and Dreams by Alicia K


So I picked up some of the new Fran-tage embossing powders from Stampendous and they are amazing......I have used quite a few of the colours now and you can get actually two different looks from them.....how you ask??? If you heat it from the top it gives you one look and if you heat it from the bottom it gives you another!!! You really have to try this stuff it's amazing!!! It actually tells you on the jar to heat it from the bottom and if it wasn't for one of our awesome customers....thanks Arlene!!!......I would never have known. Who reads instructions anyways.....lol.......it's just embossing powder!!! :)

When I found out we had to do a Kids Theme......I was seriously wondering what I was going to do.....then I remember that I had the Kaisercraft Magic Happens 6"x6" Paper Pad and it has such cute fairies and then I remembered I also had the Flourishes- Kids at Play stamp set, so I thought that this would be a good combination to make a great birthday card for a little girl!

So, here's how I made it.........I used my spellbinders dies to cut out 4 of the diecuts then I used my embossing folder on one of them and with my blending tool and the dusty concord ink I highlighted the raised image and around the outside. Then on the dark purple cst diecut I used the stamp with the versamark and then embossed it using my new shabby blue embossing powder, hey, did I mention that I love this stuff yet :)......then I thought that it just needed a little something, so I used my scor-tape and the mixed berries glitter around the die cuts..........and what little girl doesn't like glitter!!! Now I adhered my embossed image over the embossed diecut, Then I used the corner chompers on the patterned paper and all 4 corners of the card, then I added the ric rac and pop dotted the diecuts to the front of the card. I added a sentiment and little more glitter and of course some bling!!! The sentiments are from Gina K set.....I thought they matched perfectly with the card!!! Well that's pretty much it for this card..........I hope you all have a great week!!! Until next time............

Go and check out the embossing powder at Scrapbooker's Paradise Online Store you just never know what else you might find while you're there!!!

Wednesday, August 3, 2011

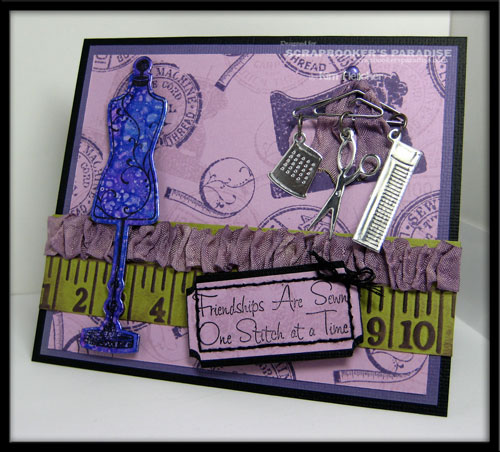
Sew Nifty Card

Hi all, so who's ready for another card??? We got the cutest stamp and die set in from My Favorite Things and I just fell in love with the little scissors!!! So I decided to use it for this post.....and I even used my favourite colour.........Purple!!! So onto today's post..........


Products Used:
Cardstock:Black, Dark Purple, Light Purple, Green and Ranger Metal Foil Sheets
Inks: Ranger Archival Ink Black, Black StazOn, Tim Holtz Distess Inks- Dusty Concord and Milled Lavendar, Tsukineko GlazOn and Ranger Alcohol Ink Nature Walk
Misc.: Tim Holtz Hangers, Cuttlebug Embossing Folder- Measure by Measure, Seam Binding, Black Floss, Needle, Tim Holtz Ruler and misc. brad


So first I stamped the dress form, then I cut the foil with the dies and then I applied the Glaz On, (this way when I apply the alcohol ink it won't react with the StazOn) now I applied the alcohol ink to the dress form. I just love these dies, they are just soo cute!!! For my tutorial on how to line up your dies and stamps click here. I stamped the lt. purple cst with the stamps and both distress inks. I embossed the green cst with the measuring tape folder and inked it with the dusty concord. I dyed the seam binding with the distress ink pads and crumpled it up, then I dried it with my heat tool and adhered it to the top above the embossing. I stamped the saying on the punched shape and sewed around it adding a tiny bow at the corner. I hung the 3 little die cuts from the hanger with jump rings and added a small piece of the dyed seam binding. Then I used a brad to attach it. Well that's pretty much it for this card..........so until next time......................Have a great week!!!

Sew head on over to the Scrapbooker's Paradise Store and check out the products............don't forget that there's .................Free Shipping on Canadian orders over $50.00!
Shipping Order total calculated before GST. Offer valid only within the ten Canadian provinces. Orders destined for Labrador, Nunavut, Yukon, NWT, United States and abroad will be charged the actual shipping amount

Tuesday, July 26, 2011

Hello Friend Pocket Gift Card

Hi all....well it's time for another tutorial on the Scrapbooker's Paradise Blog....so if you would like to know how to line up your stamps with your dies head on over there for my tutorial. Here's the card I made using My Favorite Things Die-namics- Pretty Pocket............

Products Used:
Cardstock:Black, White and Basic Grey Out of Print 6"x6" Paper Pad
Inks: Tim Holtz Distress Inks- Weathered Wood, Faded Jeans and Chipped Sapphire, Ranger Archival Black Ink

So I used the embossing folder on the patterned paper and adhered it to the front of the card. Then I cut out the pocket from the front of the card and used my ink blending tool with all 3 Distress Inks over the embossing. I used my scor-tape on 3 sides of the pocket I made in my tutorial and lined it up on the inside of the card so when it's closed you will see the pocket. I also stamped friend and hello on the tabs I die cut and then used my distress inks on them. These are placed one on the outside and one on the inside. Here's what the inside looks like:


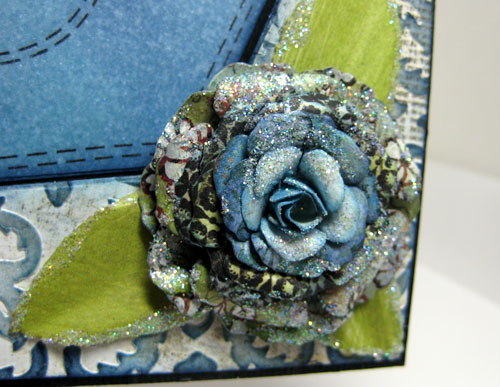
You can use the pocket on the inside for a gift card. Then I made a rose from some of the patterned papers and the rose creations die and I also cut out some leaves. I used the glue gloss on the rose and the leaves, then I sprinkled some of the glitter on them. Then I adhered it to the front of the card. Here's a close-up of the rose, you can actually see the glitter :)..............


So that's it for how I made this card...............so until next time........................Have a great week!!!


Saturday, July 16, 2011

Another Featured Product Post and a Giveaway!!!

Hi all, guess what.....it's time for another Featured Product Post and a giveaway, want to know how you can win one of the Featured Product??? deets will be at the end of my post.......

So here's the featured Product from July 16th-31st...................

All Single Image C.C. Designs stamps from July 16th-31st that are regularly priced at $7.50 are on special for $6.25 Just quote CODE: FICC in the comments section of your order when ordering them online from Scrapbooker's Paradise online store.

Don't forget to check out Sara's blog and see what she did with her's.....I'm sure you will love it!!!

So here's what I did with mine...................
Products Used
Stamps: C.C. Designs- Cupcake Phillip and Park Bench, Little Paper Shop- Make A Wish, Imaginisce-Happy Harvest Swirling Leaves
Misc.: Sakura Gelly Roll- Stardust and misc. brown sheer ribbon


So I thought that I would use our new Imaginisce Happy Harvest line.......I love the colours in this line and the papers are just amazing!!! So I decided to do some paper piecing and did little Philip with some of the papers from this line and I also used my copic markers on him as well, then I fussy cut all of it! I stamped the park bench and used my copics on that and fussy cut it as well. The rest is just some layering.....okay maybe lots of layering.....:)....I also die cut the border from the Parisian Accents set and weaved the sheer ribbon through it. I used the Swirling leaves stamp and stamped it on the cst multiple times and then coloured it in with my copics. Stamped the sentiment and like I said......some....oops, I mean lots of layering!!! Well that's pretty much it for this card, I hope you all enjoyed it!!!
 
So who would like to win one of the C.C. Designs single stamps??? Head on over to the Scrapbooker's Paradise Blog and leave a comment on the Featured Product Post...........and don't forget to check out Sara's blog and see what she did!!!
 
So that's it for this post...........until next time.........

Sunday, July 10, 2011

Roses On Your Birthday!!!

Hi all, so who's enjoying summer??? With all the rain, I sure hope that summer is somewhere around the corner.....we seem to be getting more rain than shine :) So I just love the Heartfelt Creations Dies and Stamps and I love that they have more than one stamp set for their dies. So here's what I came up with for today's post............
Products Used:
Cardstock: White, Tim Holtz Coredinations- Weathered Wood and Victorian Velvet and Kaiser Craft Velvet Ensemble 6x6 Paper Pad
Inks: Tim Holtz Distress Inks- Victorian Velvet, Aged Mahogany, Crushed Olive and Forest Moss
Misc.: Prima Lace

This is a fairly simple card, but I did do a bunch of layering. So first off, I did all the stamping on the white cst and used the dies to cut everything out twice. Then I pop dotted the flowers and all of the leaves. I used the punch on one of the patterned papers and did a bunch of layering with the patterned paper, cst and lace. Once all of that was done, I adhered the two roses and the leaves with the flourish. Then did some more layering with cst and patterned paper and stamped my sentiment. I guess that's it for this one. The new Kaiser Craft Velvet Ensemble Papers are just so gorgeous and they go great with the Heartfelt Creations Roses Dies and Stamps! So until next time...........Have a great week!!!

Don't forget if you're shopping at Scrapbooker's Paradise Online Store that there's
Receive FREE shipping on orders over $50 placed before July 31st, 2011. 

Shipping order total calculated before GST. Offer valid only within the ten Canadian provinces. Orders destined for Labrador, Nunavut, Yukon, NWT, United States and abroad will be charged the actual shipping amount.

Monday, July 4, 2011

Sunflowers, Butterflies & Blue Skies!!!


Hi all.....it's Showcase Monday on Scrapbooker's Paradise Blog and this month's theme is Summer Fun........since I don't do a lot of scrapbooking this was a hard theme for me......but I did come up with something and I hope you all like it!!!

When I think of summer, it reminds me of butterflies and sunflowers, so here's what I came up with............

Products Used
Cardstock: Light Aqua, Dark Aqua, Brown Strathmore Watercolor Paper and Prima 6"x6" Madeline Paper Pad
Stamps: Flourishes- Sunflowers and Country Charm
Inks: Ranger Archival Ink-Black and Momento-Rich Cocoa
Misc.: Creative Imaginations Twinkling H2O's-Solar Gold, Warm Pecan, Lemondrop, Rainforest, Kiwi and Navajo Pearl, Sizzix Embossing Folder- Butterfly Migration, Sakura Koi Waterbrushes, Tim Holtz Sanding Block, Copic Glitter Marker-Lipstick, Eclipse Masking Tape and misc. Brown Ribbon

I wanted to play with my Twinkling H2O's and do a sunflower, so I stamped the large sunflower with the black archival ink from the flourishes set, then masked it and stamped the leaf and then masked it again and stamped the small sunflower bud. Then I used my waterbrush and coloured all of it with the H2O's. I stamped the sunflower again and coloured that in, shaped it and cut it out. It's pop dotted over the first one. I stamped the little ladybug, coloured it in with the glitter marker, then cut it out, shaped it and pop dotted it. The pic really doesn't do it justice, as it's much more shimmery in person! Then, I used the embossing folder on the patterned paper and the dark teal cst, sanded and used the rich cocoa around the edges. I punched the lattice out of the patterned paper and layered it on top, then pop dotted the sunflower, which I layered with the brown cst. Stamped and die cutted the sentiment and added the ribbon. Adhered all of this to the card base. That's pretty much it for this card............so I hope you all enjoyed my version of summer!!! Have a great week, till next time..............

So if you would like to pick up some of the Twinkling H2O's or just want to do some shopping............check out Scrapbooker's Paradise Online store............I'm sure you will find tons of stuff to order!!  :)

Tuesday, June 28, 2011

Cards Stamped with Acrylic Paint!!!

Hi all, well it's time for another tutorial on the Scrapbooker's Paradise Blog........and this time we are playing with Acrylic Paints, I used the Ranger Acrylic Dabbers, this is such a fun way to expand your stamping! So check out this post for my tutorial!!! This is the card that I did..............


Products Used:
Cardstock: X-press It Blending, Coredinations Tim Holtz 12"x12"-Tumbled Glass and Shabby Shutters
Ink: Tim Holtz Distress Ink- Tumbled Glass, Broken China, Shabby Shutters and Crushed Olive, Ranger Archival Ink Black
Stamps: Kaiser Craft Chapter One and Occasions
Misc.: Ranger Acrylic Dabbers- Pearl and Gold, Ranger Ink Blending Tool and Pink Paislee Daily Junque Twine

For the deets on how I did the stamping with the acrylic dabbers....click here. So all I did to finish this card is I used the Coredinations Shabby Shutters CST for the card and layered the Tumbled Glass CST over it. Then I used the Scallop corner punch on only 2 of the corners of the stamped piece. I added the twine and adhered it to the card. Now I die cut the banner and stamped the sentiment with the black archival ink and used the blending tool to apply the distress inks, this was pop dotted up in the center. That's all for this card! I hope you all have some fun playing with the acrylic paint dabbers!!!

Here's another card I did:


Products Used:
Cardstock: White, Black and Kaiser Craft Chapter One- Motive and Beginning
Ink: Ranger Archival Ink Black
Stamps: Purple Onion Birthday Banner & Kaiser Craft Chapter One
Dies: Spellbinders Labels 4 and Labels 4 small
Misc: Ranger Paint Dabber Pearl, Want 2 Scrap Bling Strips, Tattered Angels Glimmer Mists- Hula Hoop, Dragonfly, Olive Vine and Electric Blue

The only thing I did different with this card is I used the Tattered Angels sprays instead of the distress inks.........there are so many options when you use the acrylic paints.......so have fun getting inky or should I say painty!!! :) That's it for this time.........so until next time.......Have a great week!!!


So who want to play with some acrylic dabbers???? Head on over to Scrapbooker's Paradise Online store and don't forget that there's..........
Receive FREE shipping on orders over $50 placed before June 30th, 2011. 
Shipping order total calculated before GST. Offer valid only within the ten Canadian provinces. Orders destined for Labrador, Nunavut, Yukon, NWT, United States and abroad will be charged the actual shipping amount.