Sunday, November 28, 2010

Falling Snowflakes................

So I hope everyone is having a great weekend!!! I'm not one that particularly likes the cold, so I am soooo happy that it's finally warming up here.......now, if only it would stay like this for the whole winter I would love it!!! Well, I have another card for you and I couldn't resist using some more of my Bo-Bunny Midnight Frost Paper.......this has to be one of my favs this year, so here's another card done in the blues..........


Products Used:

Cardstock: Navy & White
Misc.: We R Memory Keepers Sew Easy- Stitch Piercer, Burst Stitch Piercer, Mat & Blue Floss American Craft Ribbon Satin with White Dots Denim Ribbon

This is a fairly quick card to make, I think doing the stitching took the longest.......I used the Burst to do the stitching and I only used 3 of the strands for the stitching. I stamped the snowflakes and embossed the patterened paper with clear EP. Die cut the snowflakes and use the Crystal EP on the navy cardstock and used the winter wonderland EP on the white cardstock..........this really does shimmer more than in the photo, I really wish I could capture it on the camera!!!

Here's a close up of the snowflakes..........


I absolutely love this set from Flourishes......I kinda designed the card around the snowflake sentiment.......it's just too cute!!! Then, I added some ribbon and bling, that's pretty much it for this card, So are you all ready for Christmas? I'm getting there, still have some giftys to buy and cards to mail........they should get them in time for Christmas.........lol.........Have a great week!!!

Don't forget to enter our Sketch Challenge.......we would love to see what everyone comes up with!!!

Also, your favourite online store, Scrapbooker's Paradise is offering FREE SHIPPING on all orders over $50 shipped before November 30th, 2010

Friday, November 19, 2010

Playing in Paradise Sketch Challenge #2

Hi everyone.....it' s time to see what the sketch for this month is and I hope you all will play along, you have until Nov 30th to play with us.........
Card Challenge


Scrapbooking Page Sketch

So you can do either one............or both if you wish!!! I decided to do the card.............scroll down to the end of my post and check out what all the other gals have done, just click on the links and it will take you to their blog........


Products Used:

Prima Fairy Flora 6"x6" Paper Pad
Copic X-press It Cardstock
Purple & Green Cardstock
Ranger Sticky Back Canvas White
Justrite- My Garden Set
Craft & Glitz Glitter- Lavender
In The Making Glitter- Cool Highlights
Stampendous Embossing Powder- White Pearls
Momento Tuxedo Black
Distress Ink Pad - Milled Lavendar
Crafter's Workshop 6"x 6" Template- Mini Cosmic Swirls
Copic Markers in the following colours: V17, V15, V12, YR18, Y17, Y38 & 0(Colorless Blender)
Spellbinders Dies: Standard Circles LG & Scalloped Circles LG
Cuttlebug Embossing Folder- Polka Dots
Harmonie Chipboard Butterfly
Kaiser Craft Silver Rhinestones
Distress Stickles- Rock Candy
American Crafts- String Caramel
Buttons

So here's how I put it together..............I used the paper from the Prima pad and embossed it with the Polka Dots folder, then layered the green cardstock and a strip from the Prima pad and then the Purple cardstock.  I stamped the image and sentiment from the my garden set and cut them out with the Spellbinder's dies. Coloured the image with my Copics and used the distress ink on the sentiment. Adhered them all to the scalloped circle.

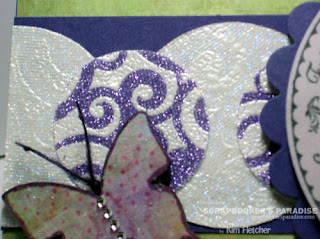
Now for the fun part.......I just had to try a new technique......I cut the circles from the Sticky back canvas and used the sticky side of it and put my mini cosmic swirls template on it and applied the embossing powder, then I peeled off the template and heated the embossing powder. Then you apply the glitter. I just love this technique!!! Here's a close up of what it looks like...........it is more glittery in person..........


So now I glued the Prima paper to the butterfly and trimmed, I used my Copic to go around the outside of the butterfly and to colour the string. Threaded the buttons on and made some antennas and glued the butterfly on to my card. Now what's a card without some bling..........lol...............so I added the rhinestones.

So now check out what everyone else has done with the sketch and say hello while you're there...........


Linda Carson

Also check out our Scrapbooker's Paradise Blog for lots of great ideas and inspiration!!!!

Don't forget that Scrapbooker's Paradise has free shipping until the end of November....... and our Stampavie stamps are 15% off from Nov 16-30. Quote STAMPAVIE in the comments section of your order form. Head on over to Scrapbooker's Paradise to do some shopping, there's loads of great products!!!


Tuesday, November 16, 2010

Stampavie Stamp Challenge!!!

Hi all, today is my feature post for Scrapbooker's Paradise.......and the feature is Stampavie Stamps......so I picked a cute christmas stamp with an adorable Teddy Bear!!! I love how this turned out.......I did something different with my copics and a snow marker, I hope you like it, see below for products used and a short tutorial..........
Products Used
Cardstock- Red, Dark Aqua and X-Press It Copic
Paper- Harmonie Noel-Rudolph
Copic Markers:Y08, YR65, YR68, R35, R37, G17, BG10, BG11, BG13, BG18, E71, E74, E77, W00 & W1
Copic Atyou Spicas: 21 Lipstick, 00 Clear & 11 Gold
Spellbinders Dies: Grand Labels 1 & Labels 8

Stampendous Embossing Powder-Stardust

I just had to try the new Grand Spellbinders..........so you can use them in your Cuttlebug, Big Shot etc., you just can't use all of them depending on your machine, I found that the Big Shot will do more of the dies than the Cuttlebug or the Wizard, just because it has a wider platform. These dies are great for making your own shaped cards, so if you don't mind not being able to use a couple of the larger ones.....you just have to try them!!! So onto my card........I folded my cardstock in half and cut with the Grand Labels die.

I cut embossed and layer the harmonie paper, then I punched the Double Arches punch on both sides of the cardstock.......I love these punches soo many fun things you can do with them. After I did the punching I cut it with the die. Now I decided it need a little something......so I used the versamrk and the stardust embossing powder on the punched part. I pop dotted this to the card.

Onto the stamped image......I stamped with the Momento and coloured it in with my Copics, Snow marker and Spicas. How did I do the teddy???....I used the snow marker on him and then coloured him with the Copics.......then heated it with my heat tool. This made the image puff up and give him some texture......then I added some more colour with my Copics. I thought that this made him look adorable.

I used flocking on the little birdie and the snow marker on his hat. Pop dotted the flower and added some gold flower soft. Cut out with the die and then added some rhinestones. Stamped and embossed the sentiment with the stardust EP and that's it!!! I hope you enjoy my card and have a super week!!!

Now check out Sara's Blog to see what she has done with her image!!! Head on over to the Scrapbooker's Paradise Blog to see all of our projects!!! While you're there sign up for our emails so you don't miss out on all the awesome projects, tutorials etc......


Head on over to the Scrapbooker's Paradise Online store to take advantage of the FREE SHIPPING on all orders over $50 it has been extended until November 30th, 2010!!!

Sunday, November 14, 2010

Hubby's Birthday Card!!!

Here's a card that I made for my Hubby's Birthday.............

and this is the verse on the inside of the card............he just loved the card and couldn't stop laughing........I guess I picked the right saying.........lol
I really love this verse and image........the stamps are from Gina K and I coloured it in with my Copics of course!!! The old guy reminds me of Fish from the Barney Miller show, hmmmmm.......now that's really showing my age.......lol.......so anyways I decided that since he looked like Fish I would colour him like Fish!!! The rest of the card is just layering and some Spellbinders dies. Well, that's it for this post.........till next time...........

Sunday, November 7, 2010

Happy Holidays with a Flourish!!!

Hi everyone, I hope you are all having a great weekend!!! Here's another Christmas card that I made......I decided to use one of the Flourish stamps that match the Spellbinder's Labels 14 die and use some of my Copics...........


Products Used

Aqua & Burgundy Cardstock
Harmonie Noel Ornaments Cardstock

So, this is how I put the card together:

I used the aqua cardstock as the base for my card, then layered it with the burgundy cardstock which I just had to use the double loops punch on. I love this punch!!! It is so versatile and you can use it for just about any card.  Then I layered the Harmonie Ornaments cardstock. Oops, I almost forgot.....I did add the ribbon and bow before I adhered it to the aqua cardstock.

Now, I coloured in the stamp from Flourishes with my Copics on the new X-Press It cardstock.......if you have Copics you really need to try this new cardstock, it is amazing!!! I find the blending is so much easier and it is soooo smooth. Then I airbrushed it, after I cut and embossed it with the Labels dies.

Then cut and emboss the aqua cardstock out of the Labels die and mist it with the Perfect Pearls Mist......this stuff is awesome.....it gives it a pearlized finish, which is really hard to catch with the camera. Stamped the sentiment on it and pop dotted the stamped image to it. Added some rhinestones which I coloured with my Copics and voila......finished!!!

Don’t forget Scrapbooker’s Paradise has:
FREE SHIPPING on all orders over $50 shipped before November 30th, 2010


Tuesday, November 2, 2010

Paper Stripping with Bo Bunny


Hi everyone........today is Technique Tuesday and I have a awesome technique for you........I call it Paper Stripping.........lol.........I hope you all enjoy it!!!

And here's the card I made using the Bo Bunny's new Midnight Frost Papers...........love these papers!!!


Front View

Side View


Products Used

Cardstock- Navy and Light Blue
Flourishes A Gift For You Clear Stamp Set


1. Here's the papers I chose for this card. Cut the Light Blue Cardstock to 6"x12" and score with your scor-pal at 6". Then cut a piece of the navy cardstock (approx. 5"x 5") and apply the scor-pal tape to it and trim to 4.5"x4.5". This will be the piece that we will do the paper stripping on.

2. Cut the Bo Bunny 6"x6" Paper into 1/4" strips. I cut 5 of three colours and it was enough to do the navy piece.

3. Remove the top liner from the scor-tape. Apply the 1/4" strips to the middle of the navy cardstock using the scor-pal grid on the mat as a guide. You should have the same as in the photo.
4. Now add the strips of the Bo Bunny Paper, alternating the patterns. Trim pieces as you go and use them.
5. Continue alternating the paterned paper.
6. This is how it should look when you are finished. Now cut and embooss it with the largest of the Spellbinder's labels 16 dies.
7. Stamp the Bo Bunny Stamps with the Chipped Sapphire and emboss with clear embossing powder on the front of the card.
8. Cut the navy cardstock with the largest and 3rd largest die from Spellbinders Labels 15. Cut 2 of these. Now cut the Bo Bunny Snowfall paper with the 2nd largest and 3rd largest of the Labels 15 dies. Cut 2 of these. Glue as in the photo. 1st frame is glued on the card, the 2nd frame is pop dotted.
9. Pop dot the paper stripped piece in the center of the frames.(I used 3 high) Now, stamp on the light blue cardstock using Season's Greetings from the Flourish set. Stamp using the chipped sapphire and emboss with clear embossing powder. Cut out with Labels 15 smallest die and ink the edges. Pop dot in the center. Also, ink the edges of the card. Last but not least, time to add some bling , so add the silver rhinestones.
That's it for this Technique Tuesday............I hope you make many of these cards.......the possibilities are endless.